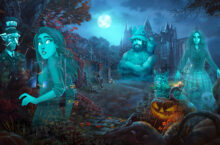
Enter the fantastical world of Slavic creatures as you embark on a journey of rescue! Our Eventide – Slavic Fable walkthrough will guide you through each step of the game. In addition, all collectibles – Ethereal Flower and Bestiary Card locations are revealed.
Contents
General Tips & Tricks
Navigating the world of Slavic creatures can be tricky. Here’s a few useful tips and tricks to help you on your way.
- When starting the game for the first time, you can choose between three difficulties:
- Casual – Hint and Skip buttons recharge quickly. Active zones glimmer and Hidden Object Scenes/Areas sparkle. Available actions are indicated on the Map, and there are no click penalties in Hidden Object Scenes. A Tutorial is also available.
- Advanced – Hint and Skip buttons have a moderate recharge time. Active zones are not indicated, but Hidden Object Scenes still sparkle. Available actions are indicated on the Map. There is a mild penalty for excessive clicking in Hidden Object Areas, and the Tutorial is still available.
- Expert – Hint and Skip buttons recharge slowly. Active zones, Hidden Object Areas, and available actions on the Map are not indicated. Hidden Object Scenes have mistake penalties, and no Tutorial is available.
- Tip: You will be able to choose your difficulty both when starting the Slavic Fable adventure and the Midsummer Night bonus adventure.
- Inventory Items are written in bold and circled in yellow in the guide below. Locations are written in italics.
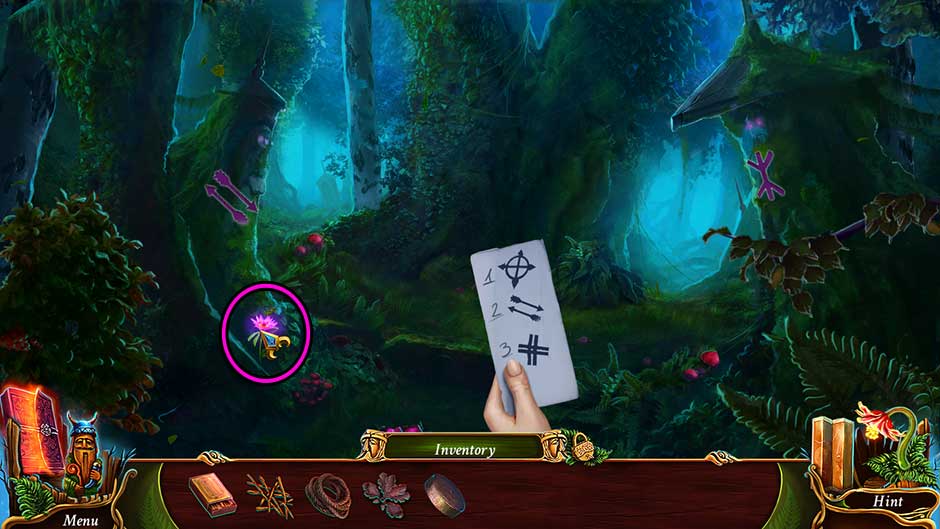
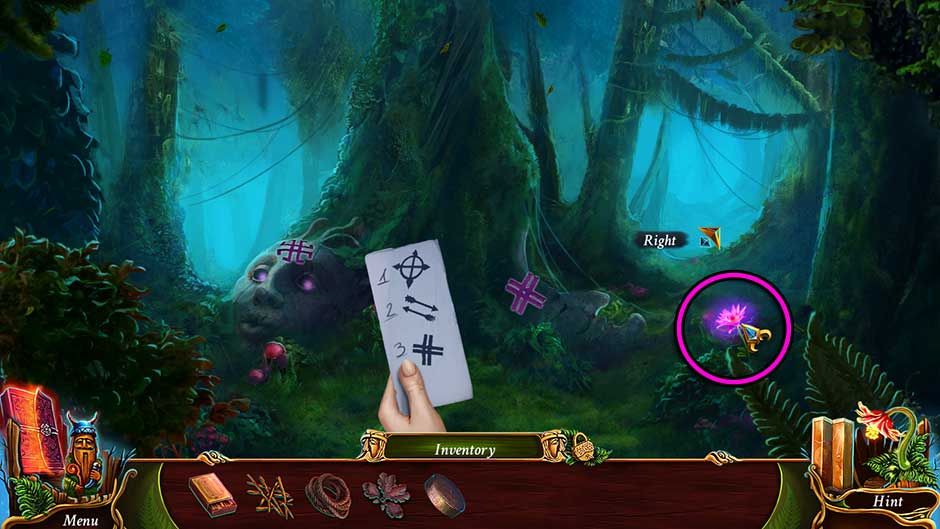
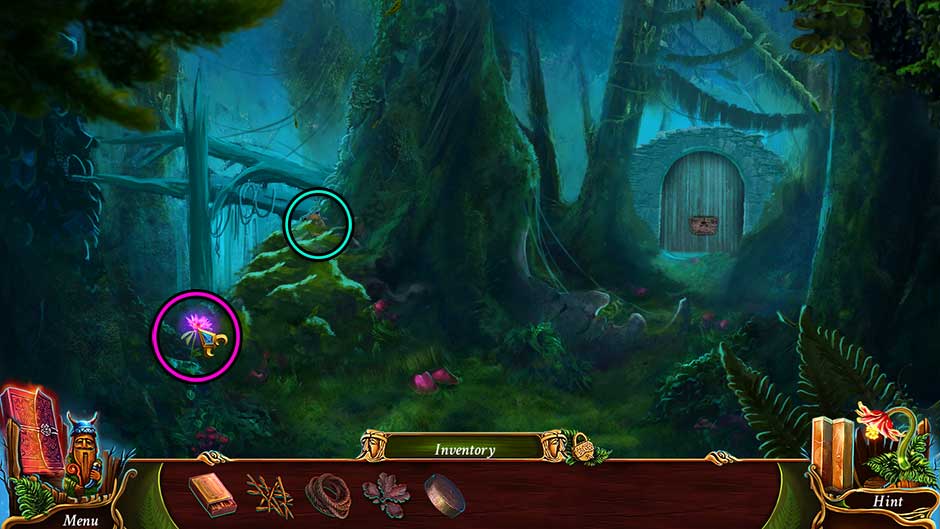
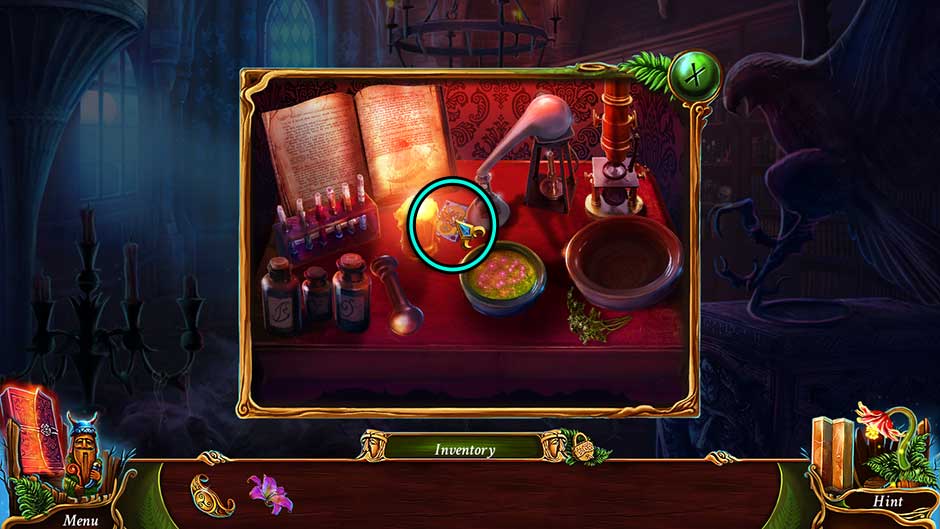
- All collectible locations are revealed in our walkthrough! Ethereal Flowers are circled in pink/purple, while Bestiary Cards are circled in blue.
- The Magnifying Glass cursor indicates you can take a closer look at an area.
- A Hand cursor indicates you can directly interact with an item or object.
- A ? cursor indicates you can click to learn more about an object you encounter.
- A Speech Bubble icon indicates you can speak with a character.
- Navigation arrows indicate you can move in a certain direction. Use this to move between locations.
- Fast-travel between locations using the Map! The Map is located in the lower right corner.
- A ! icon on the Map indicates there is an active scene or area in that location.
- Are you stuck? Try using a Hint, or even a Skip during a puzzle. Both buttons are located in the lower right corner. Both Hints and Skips are unlimited, but require time to charge based upon the difficulty you’ve chosen.
- This walkthrough covers Platinum Edition game content, too! Complete the main Slavic Fable adventure to unlock the Midsummer Night bonus chapter!
Eventide – Slavic Fable Walkthrough
Baba and the Slavic creatures are in need of your help! It’s up to you to rescue Heritage Park and the Slavic legends which reside within! Our walkthrough covers every aspect of Eventide – Slavic Fable Platinum Edition – including all Ethereal Flower and Bestiary Card locations!
Chapter 1: Baba’s House
The car swerves off the road and you find yourself in a precarious situation. Escape the car and find out where you are.
Car
- Take a closer look at the leather bag hanging on the left. Click on the Ornamental Bracelet hanging on the left strap to add it to your inventory.
- Click on the zipper to open the bag. Take a closer look at the Diary Afterward, it will appear in the bottom left corner of your screen.
- Continue sifting through the items in the purse until you collect the Nail File.
- Examine the glove compartment in the front seat. Use the Nail File to pry it open, then click on the Chest Key beneath the miscellaneous objects inside to add it to your inventory.
- Back in the read seat, click on the coat laying on the chest in the lower left corner to remove it. Use the Chest Key on the lock to open it. A hidden object area will appear.
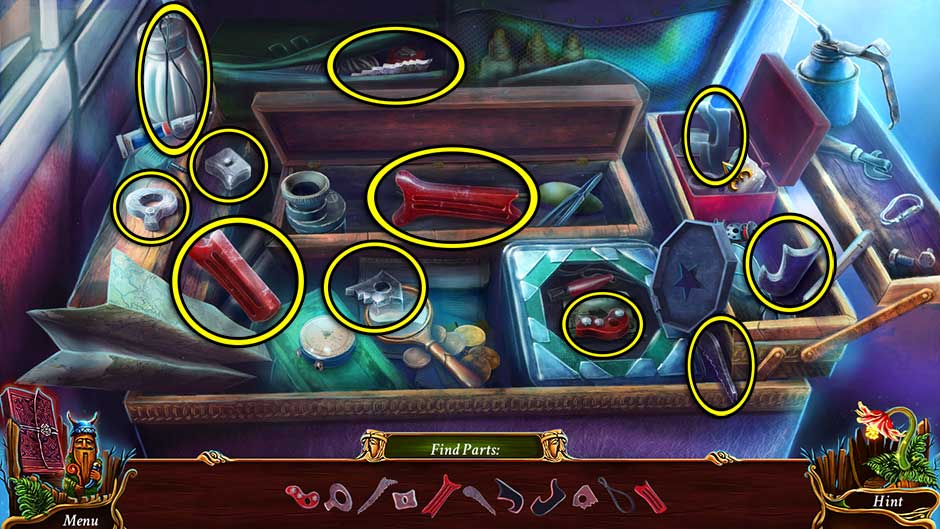
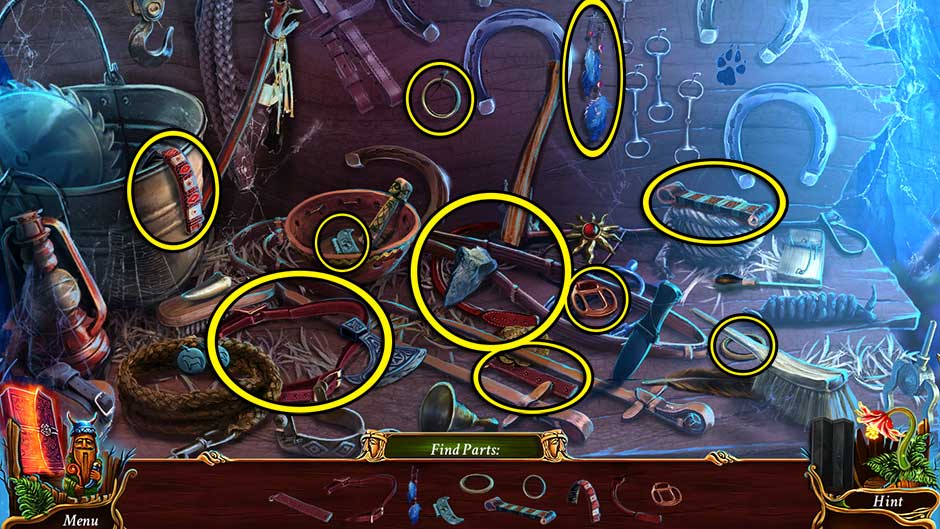
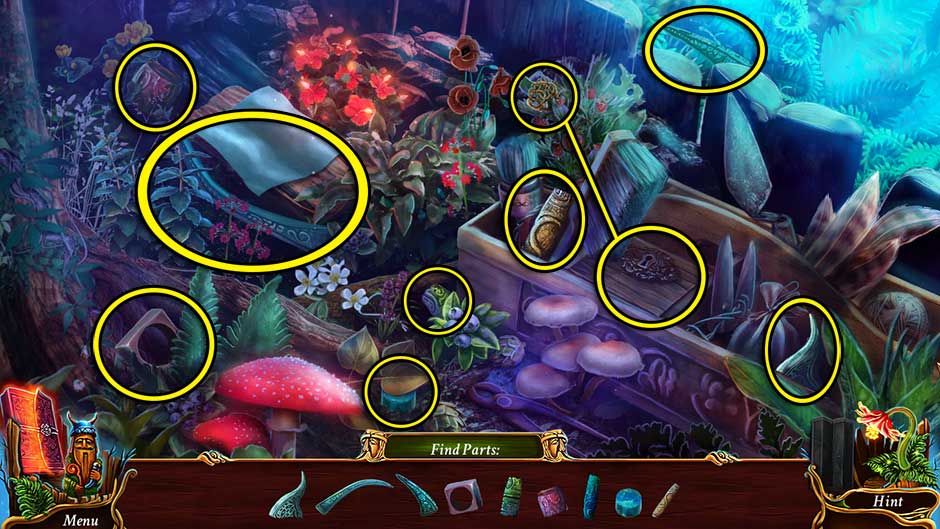
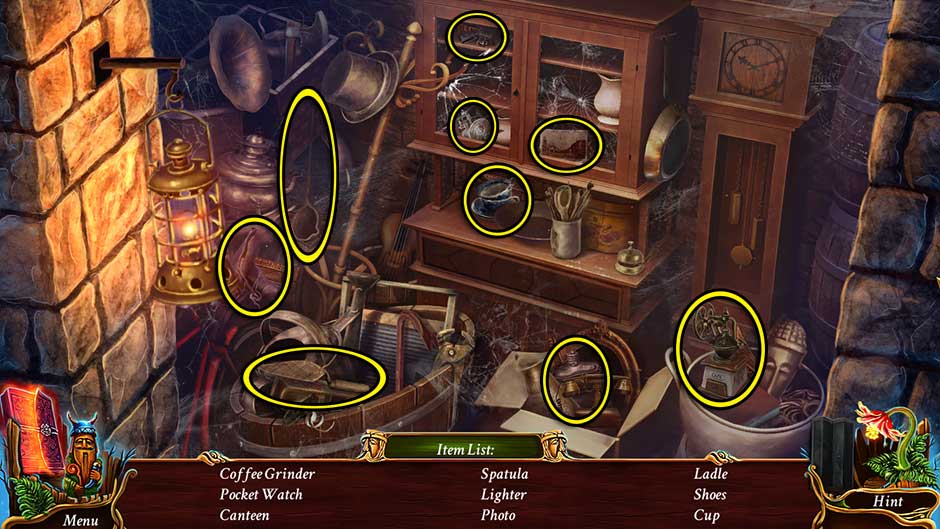
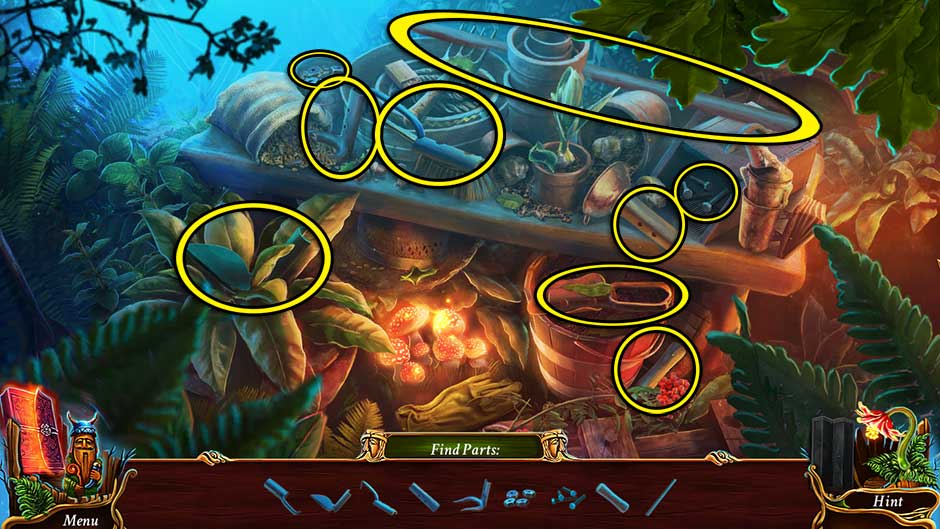
- Find the objects shown at the bottom of the screen. Items marked in blue require an extra step before you can collect them. Each object is circled and shown in the screenshot below. The key to open the star box at the bottom of the screen is hidden behind the shovel at the top of the screen
- Once you’ve located everything listed, the Pickaxe will be added to your inventory.
- Zoom in on the windshield ahead. Use the Pickaxe to break open the glass and escape!
Gate
- Speak with Boruta, standing to the left of the gate.
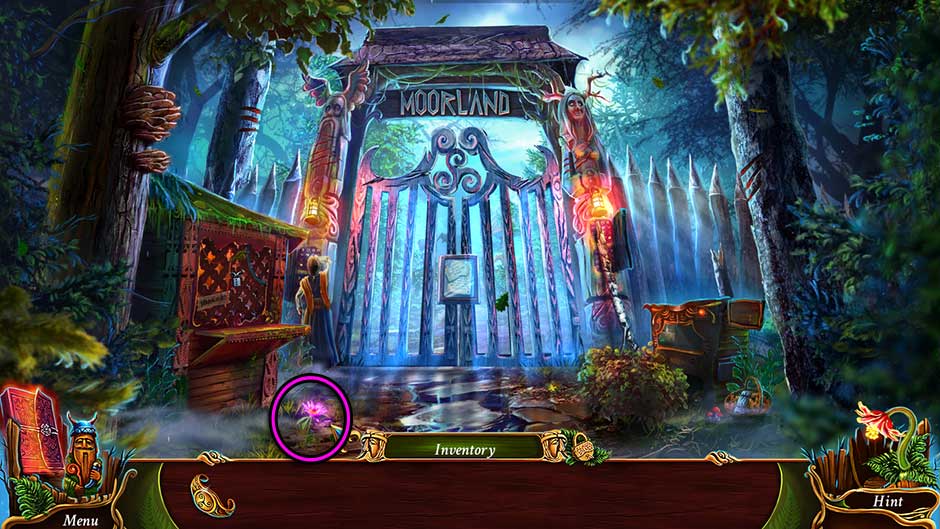
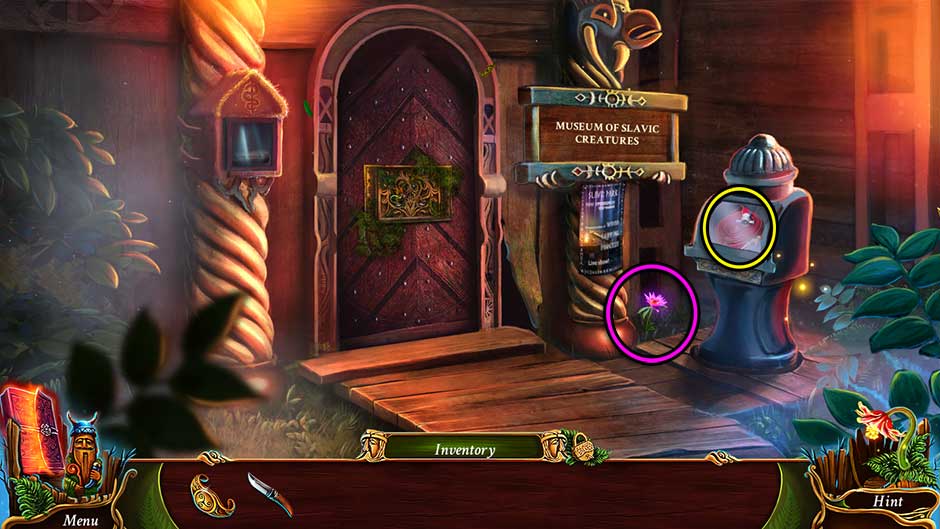
- Ethereal Flower 1/30 is located at the bottom of the screen, in front of the booth on the left.
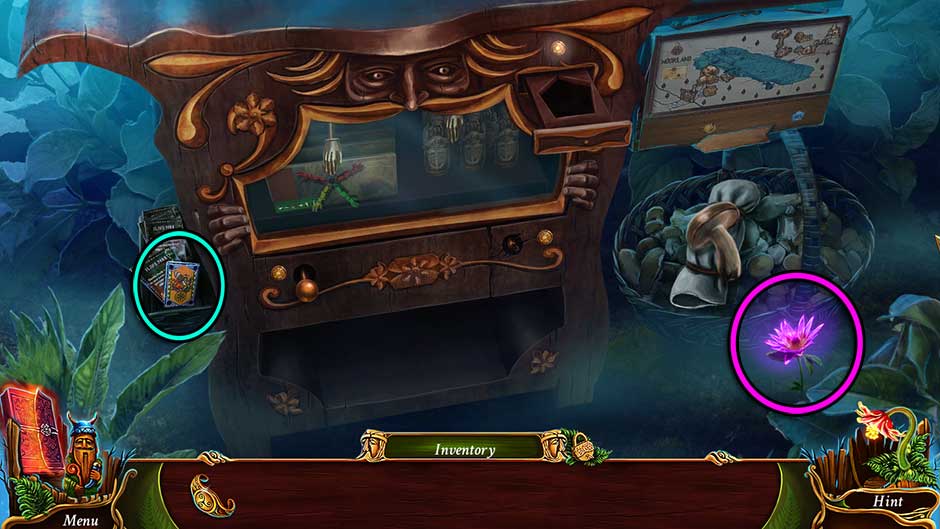
- Examine the device on the right for a closer view. Ethereal Flower 2/30 is on the right in front of the basket and Bestiary Card 1/30 is sitting in the basket on the left side of the device.
- Click on the items in the basket until you reveal the Knife, then click on it to add it to your inventory.
- Take a closer look at the kiosk on the left. Use the Knife to cut the red Rope on the right, then click on it to add it to your inventory.
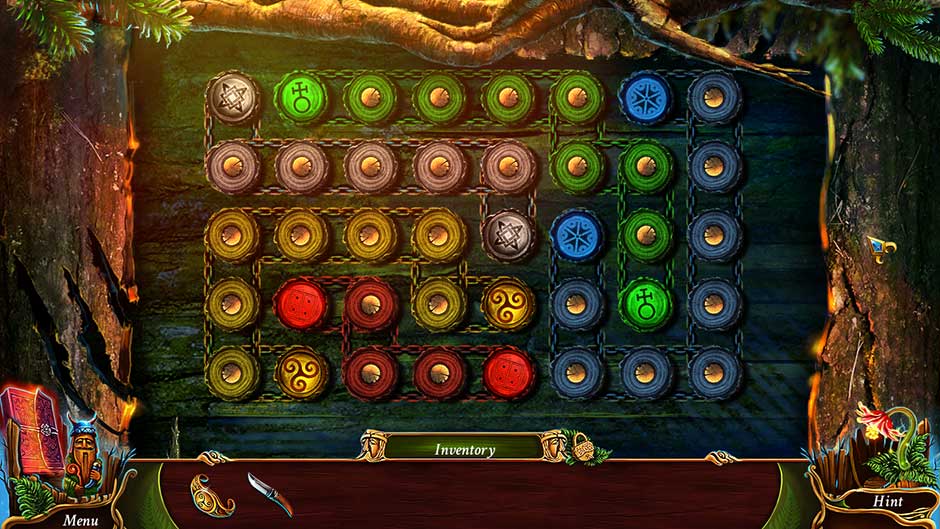
- Back in the main area, take a closer look at the right totem. Remove the debris, then use the Rope on the frayed portion remaining. Click on the level on the right to trigger a puzzle.
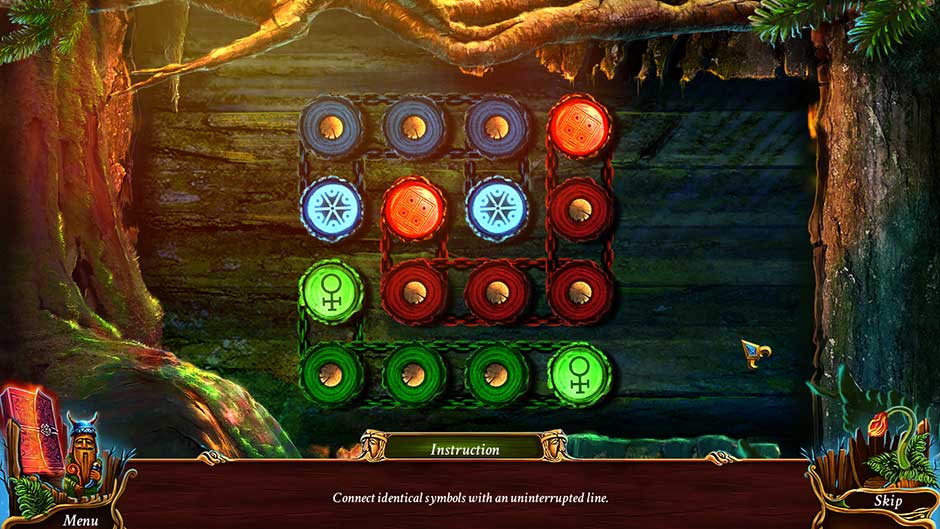
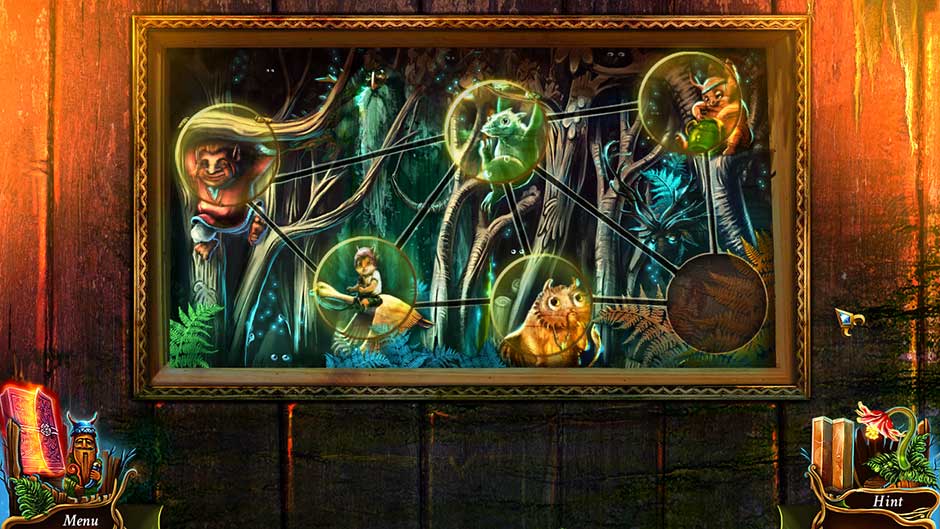
- Connect identical symbols with an uninterrupted line. The solutions are shown below.
- Upon completing the puzzle, the main gate will open. Proceed forward into the Square.
Square
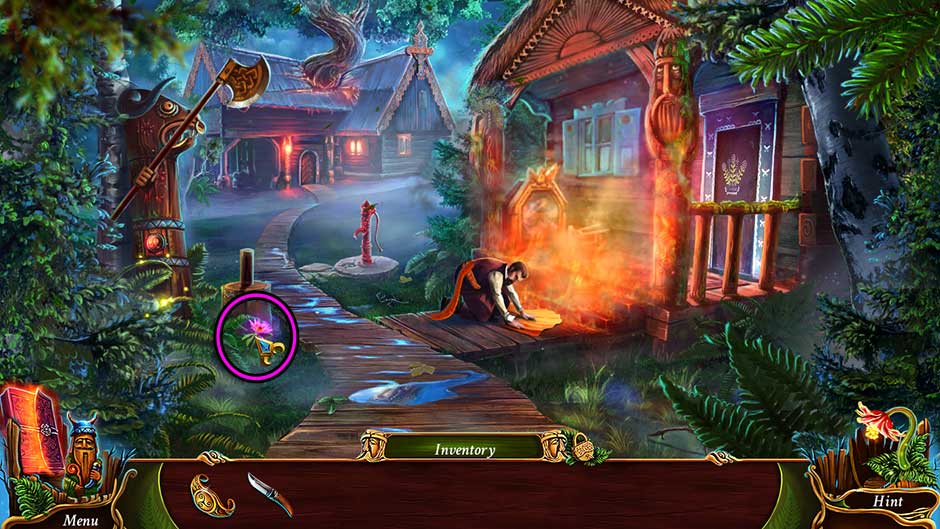
- Ethereal Flower 3/30 is located to the left of the walkway.
- Take a closer look at the house straight ahead. Ethereal Flower 4/30 is located at the bottom of the sign. Click on the case on the right to open it and retrieve the Fire Hose
- Back in the main area, examine the red hydrant straight ahead. Use the Fire Hose on the hydrant. Once connected, direct the water so that it douses all the flames on the porch.
- Once the flames are extinguished, examine the cabinet sitting on the far end of the porch. Click on the Coin 1/2 sitting in the bottom left corner to add it to your inventory.
- Enter the house on the right.
Baba House
- Speak with Boruta. He will offer you further instruction.
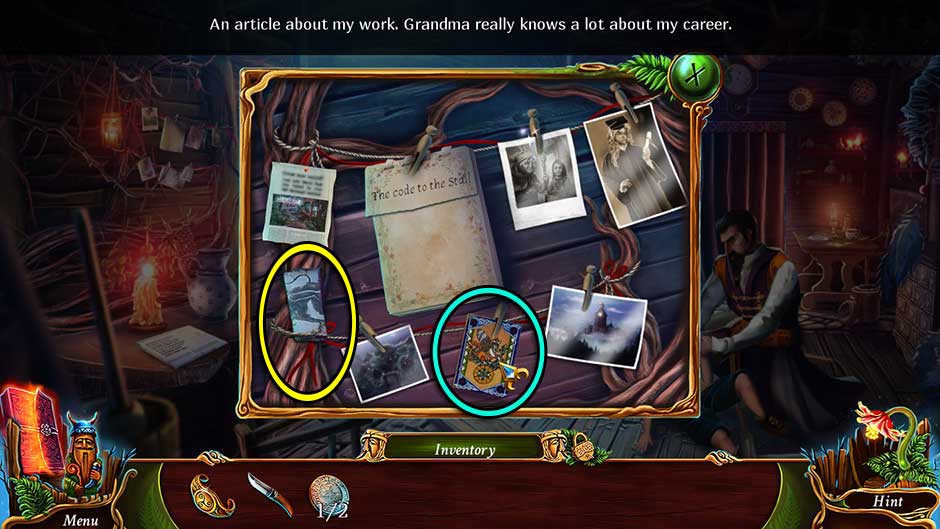
- Take a closer look at the clippings hanging on the line in the upper left corner. Bestiary Card 2/30 is hanging on one of the pins. Click on the Picture Part on the left to add it to your inventory.
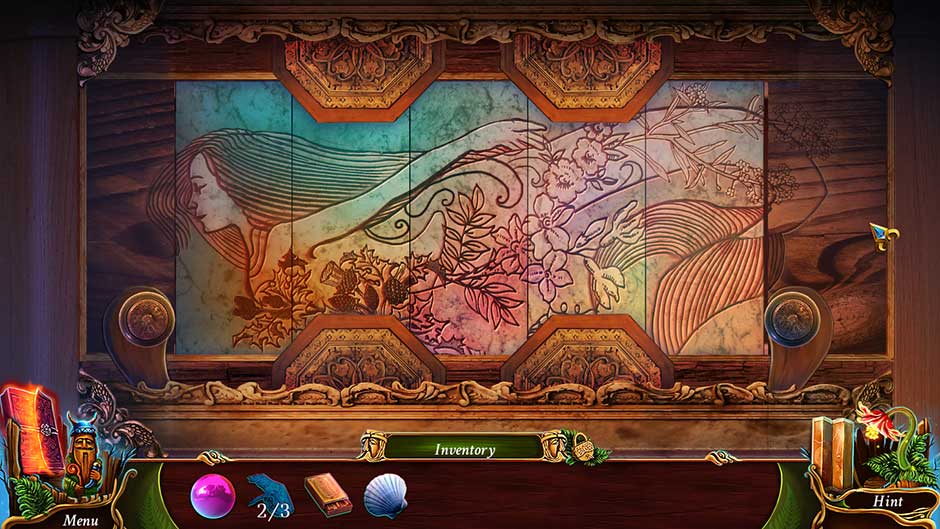
- Back in the main portion of the room, examine the cabinet at the back of the room. Click the “Begin” button to trigger a puzzle.
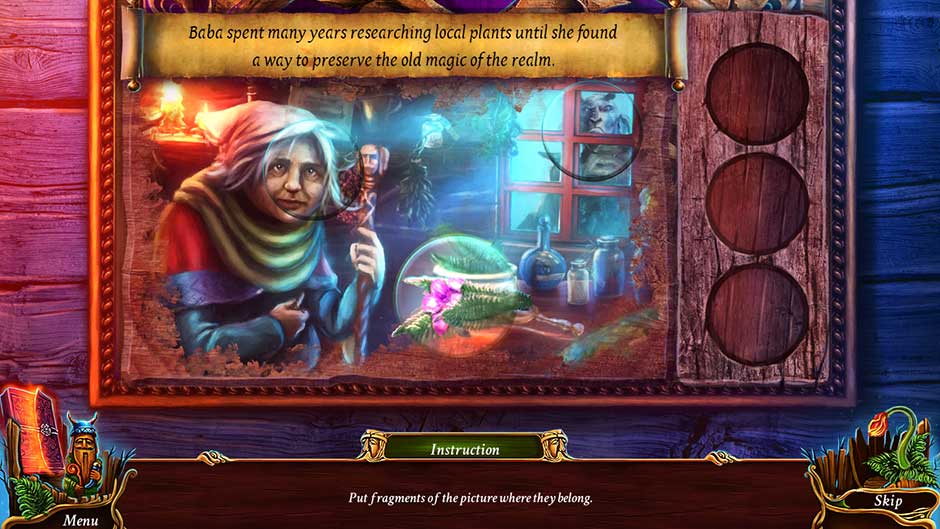
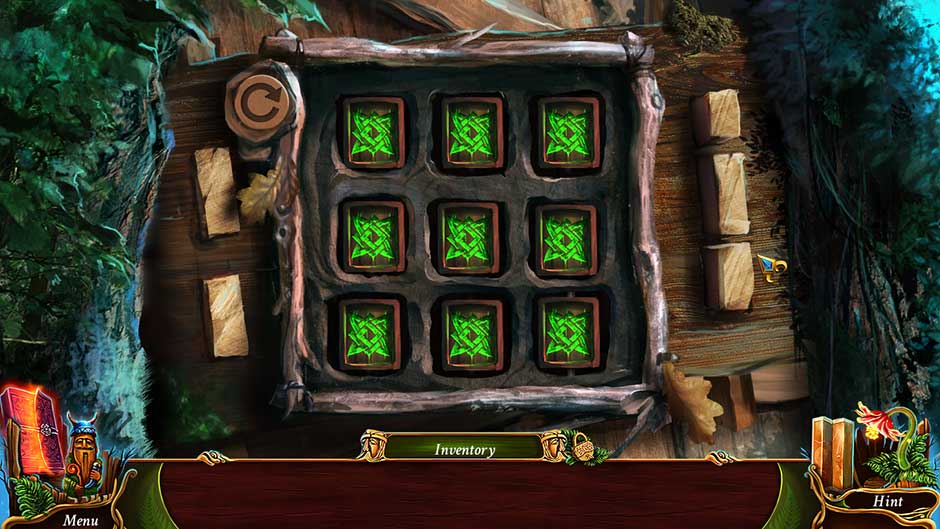
- Put fragments of the picture where they belong. Select one of the round tiles on the right and place it over the portion of picture it matches.
- Once you’ve completed the matching portion of the puzzle, use the Ornamental Bracelet on the groove that appears. This will trigger a cutscene.
- Examine the cabinet at the back of the room where you just completed the puzzle. Click on the Dried Red Clover and the Storagepart to add them to your inventory.
- Click on the curtain at the back of the room to open it, then proceed through to the next area.
Room
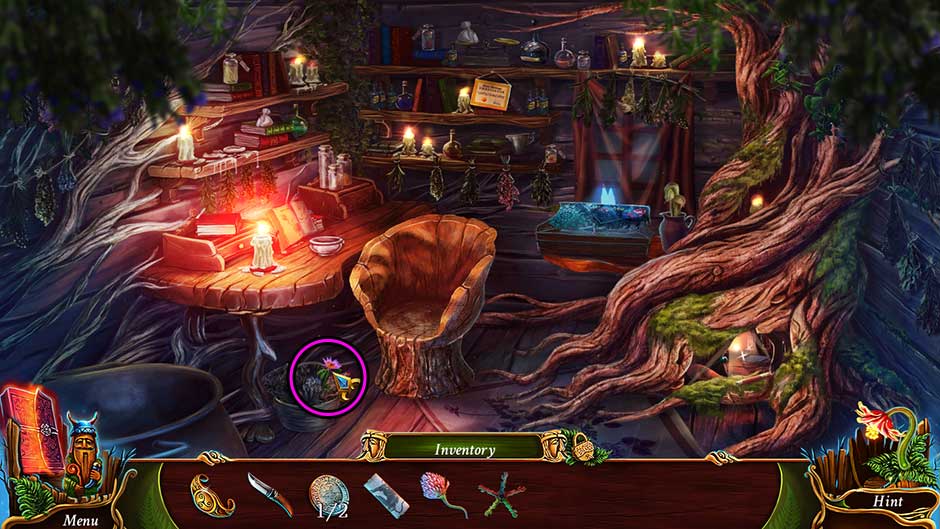
- Ethereal Flower 5/30 is in a pail beneath the desk on the left.
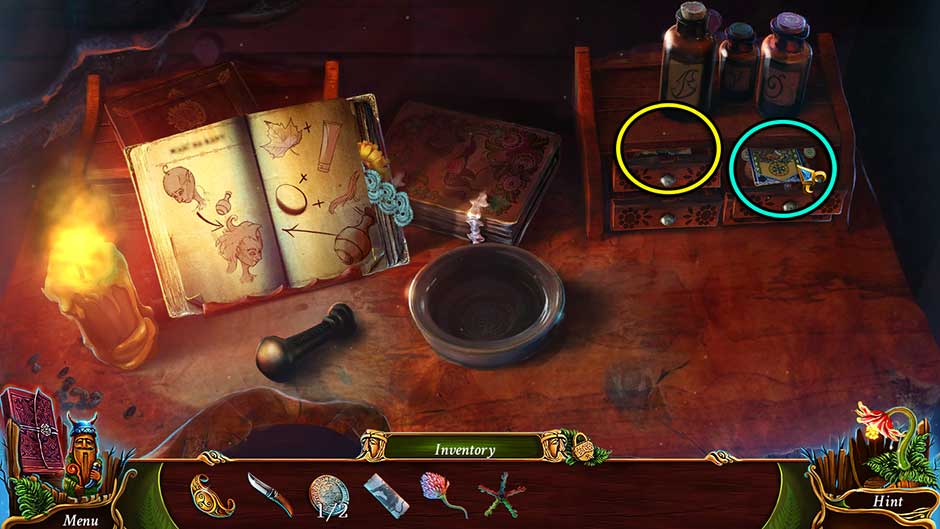
- Take a closer look at the desk on the left. Click on the top drawers of the small cabinet on the upper right. Collect the Bestiary Card 3/30 and the Nettle
- Examine the book on the left. Click on the bottom right corner of the pages until you reach one with a lace insert. Remove the items until you acquire the Marigold.
- Back in the main area, take a closer look at the bottom of the tree on the right. Use the Knife on the pencil to sharpen it. Click on the Pencil once more to add it to your inventory.
- Go back into the previous room.
Baba House
- Examine the photos hanging on the left again. Use the Pencil on the notepad to reveal important secret symbols.
- Head back to the Gate.
Gate
- Take a closer look at the kiosk on the left. Examine the lock and input the code according to the symbols on the notepad. Once the lock is opened, a hidden object area will appear.
- Locate the objects according to their silhouettes at the bottom of the screen. Some items will need to be collected before you can collect others. The solution to this hidden object area is as follows:
- Pick up the Windmill Airscrew on the upper left and place it on the windmill to find the Eye.
- Place the Eye in the sun on the right to locate the Sun.
- Place the Sun on top of the container at the bottom of the screen to acquire the Scroll.
- Place the Scroll into the device above the windmills. Rotate the discs until they create one complete picture. Then, click on the Hammer.
- Pick up the Brush lying on the table at the bottom of the screen. Pull aside the curtain at the bottom of the cabinet beneath the windmills and use the Brush to clear the cobwebs, acquiring the Key.
- Use the Key on the cabinet on the upper right, then click to open it and arrange the tiles until they form a complete picture. Once finished, collect the Glove.
- Examine the broken glass at the top of the screen and use the Glove to retrieve the Metal Plate.
- Examine the wooden figure sitting on the table. Place the Hammer in the figure’s hands and the Metal Plate on the device in front of it. Click on the figure to create the Map Coin.
- Upon completing the area, the Map Coin will be added to your inventory.
- Back in the main Gate area, take a closer look at the device on the right. Place the Map Coin into the slot in the upper right corner of the machine. Click on the lever on the lower left. Collect the Map of Moorland and the Storagepart (2) from the prize slot.
- Return to the Room.
Room
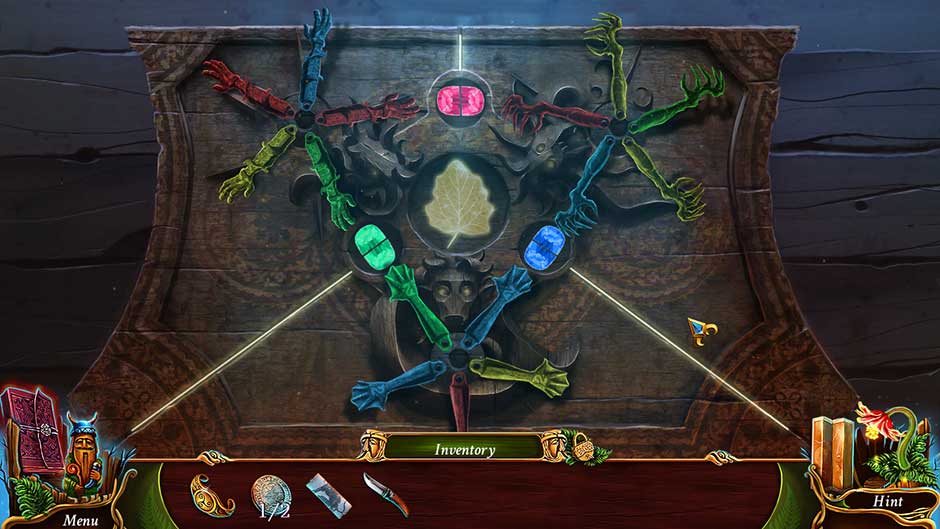
- Take a closer look at the flat chest in front of the window. Remove the blanket covering the box, then place the Storageparts (x2) into the slots to trigger a puzzle.
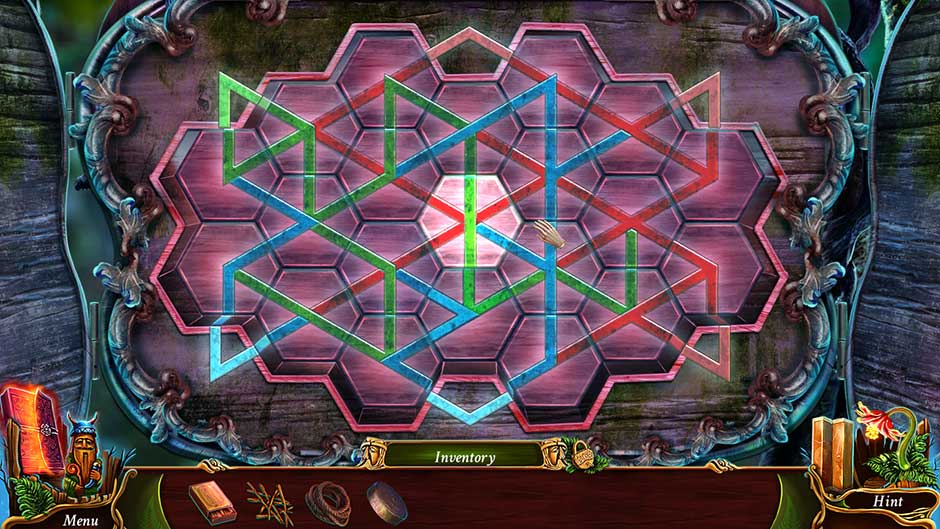
- Place the hands so that they are connected by the same color. The solution is shown below.
- Once the puzzle is finished, click on the golden leaf to open the box. Collect the Potion and the Aesculap Button and read the note inside.
- Exit to the Square.
Square
- Take a closer look at the building ahead in the distance. Examine the case hanging to the left of the door. Use the Aesculap Button on the groove to open the case and collect the Bandage
- Return to the Room.
Room
- Take a closer look at the table on the left. Place the Marigold, the Dried Red Clover, the Nettle, and the Potion into the mortar, then use the pestle to mix it all together. Place the Bandage on the table and pour the mixture onto it to acquire the Bandage with Medicine.
- Exit the room to Baba House.
Baba House
- Speak with the little boy and use the Bandage with Medicine on his wound.
- After a brief cutscene, you will find yourself back in the Square.
Square
- Zoom in on the structure ahead and examine the cap lying in front of the door. Collect the Rainbow-hued Feathers and the Pin from the top of the hat.
- Go back to the Room once again.
Room
- Take a closer look at the bottom of the tree on the right. Use the Pin to retrieve the Basilisk Figurine and add it to your inventory.
- Exit to the Square.
Square
- Zoom in on the building in the distance again. Examine the decorative plate on the door and place the Basilisk Figurine into the groove on the right. A puzzle will appear.
- Put the parts in the proper places. The solution is shown below.
- Upon completing the puzzle, you will gain access to the Museum.
Chapter 2: Museum of Slavic Creatures
Follow Lilacus into the Museum of Slavic Creatures. Will you be able to locate him? What other secrets lie within the museum?
Museum
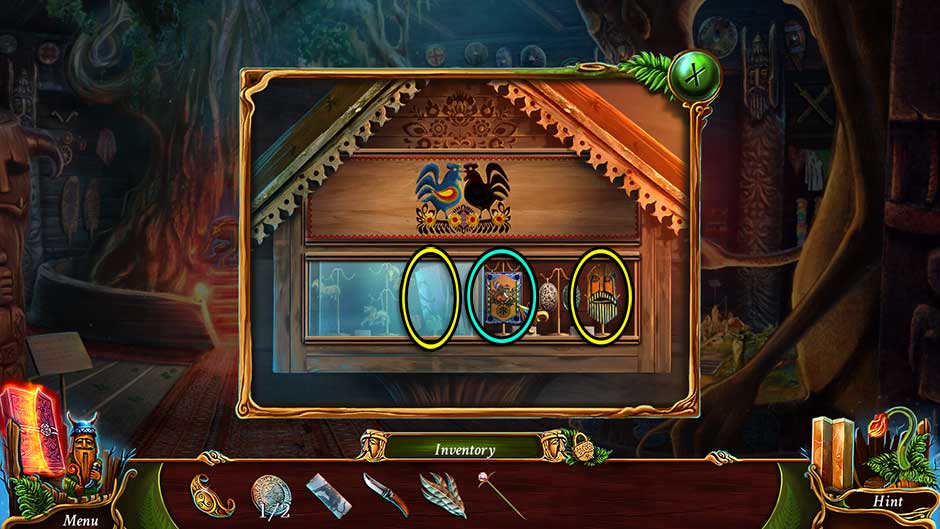
- Take a closer look at the display cabinet to the right of the tree on the far end of the room. Collect the Bestiary Card 4/30, the Picture Part (2), and the Old Man Mask.
- Zoom in on the large tree on the left. Use the Picture Parts (x2) on the slots toward the upper left to trigger a puzzle.
- Move elements of the figure to make it look like in the picture. The solution is shown below.
- Upon completing the puzzle, a secret passage to the Basement will be revealed.
Basement
- Tip: Click on the cloth at the lower right corner of the stairs, but don’t zoom in yet. You’ll return to this area later.
- Examine the purple curtain at the far end of the basement to trigger a cutscene.
- Give the Ornamental Bracelet to Lilacus. After the cutscene, collect the Crank he gives you.
- Collect the Bestiary Card 5/30 and the Carved Figurine from the table.
- Back in the main Basement area, examine the portcullis on the upper right. Use the Crank on the mechanism to open the door to the Haven.
Haven
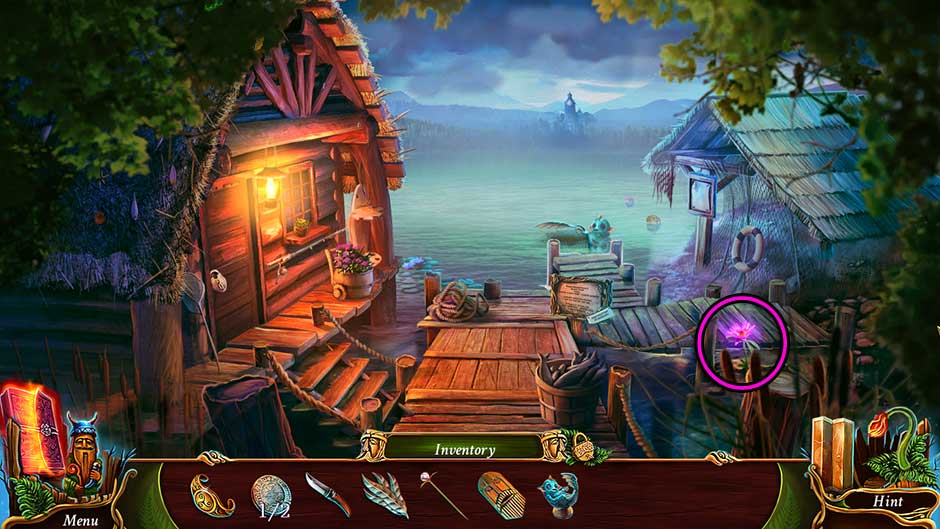
- Ethereal Flower 6/30 is in front of the dock on the right.
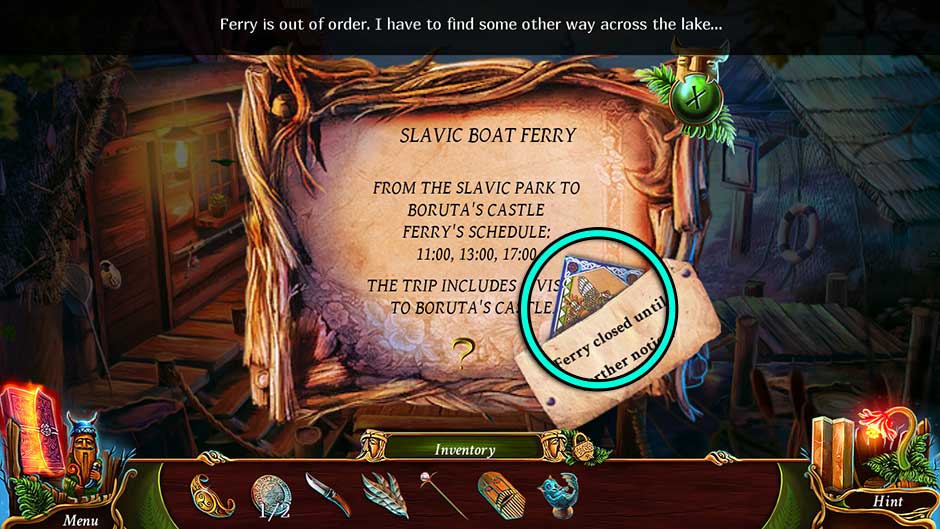
- Take a closer look at the sign on the dock. Collect the Bestiary Card 6/30 tucked away in the corner.
- Speak with the creature at the far end of the dock. Use the Knife to free him from the netting. You will be rewarded with the Fishing Line.
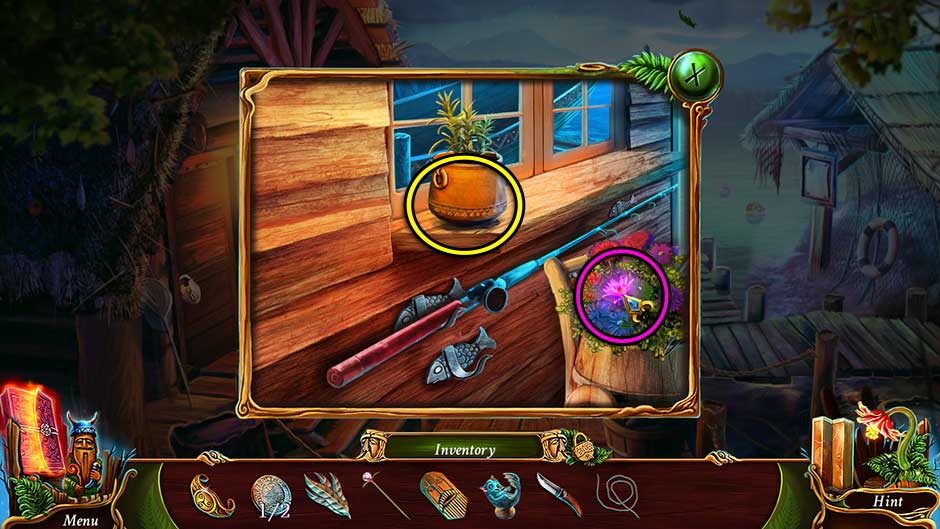
- Examine the window of the cabin on the left. Collect the Ethereal Flower 7/30 and the Ornate Key beneath the pot on the windowsill.
- Zoom in on the cabin door on the left. Use the Ornate Key to open the lock and proceed inside.
Workshop
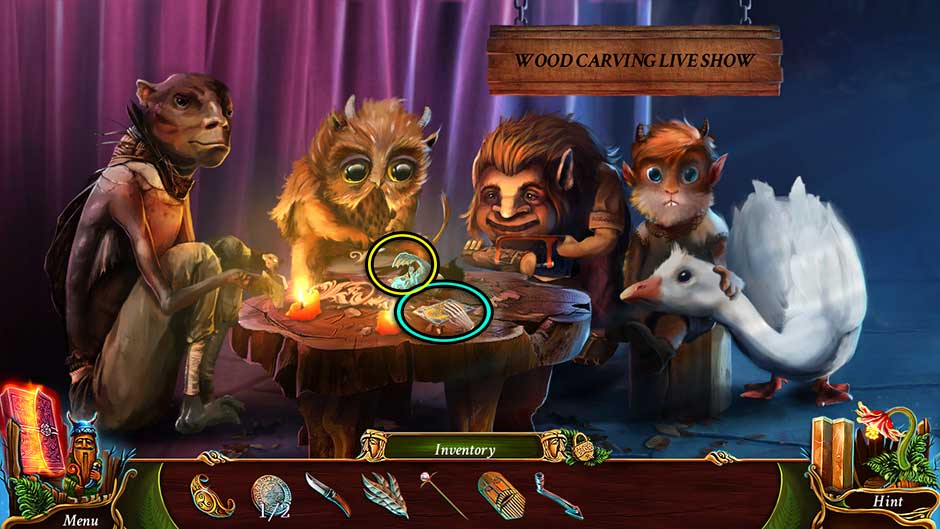
- Use the Knife to cut down the suspended net containing the wood planks at the far end of the room. Click on the Planks to add them to your inventory.
- Examine the red toolbox next to the cut netting. Click on the Coins 2/2 lying in front of it to collect.
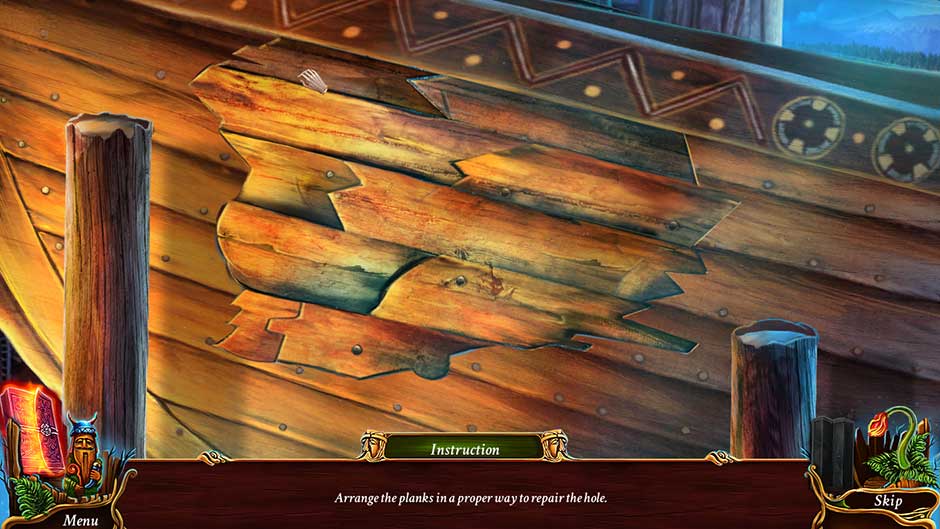
- Zoom in on the boat itself. Click on the life jacket to remove it, then click on the Tin sitting on the post on the right to add it to your inventory. Place the Planks over the gap in the side of the boat to trigger a puzzle.
- Arrange the planks in a proper way to repair the hole. The solution is shown below.
- Tip: You’ll come back to this later. For now, examine the mechanism holding the boat in place on the lower right. Click on the Safety Block sitting on the pegs just beneath the sign to add it to your inventory.
- Return to the Basement.
Basement
- Take a closer look at the mechanism to the right of the doorway leading out to the Haven. Place the Safety Block into a hole in the right gear, then click on the Crank to return it to your inventory.
- Return to the Square.
Square
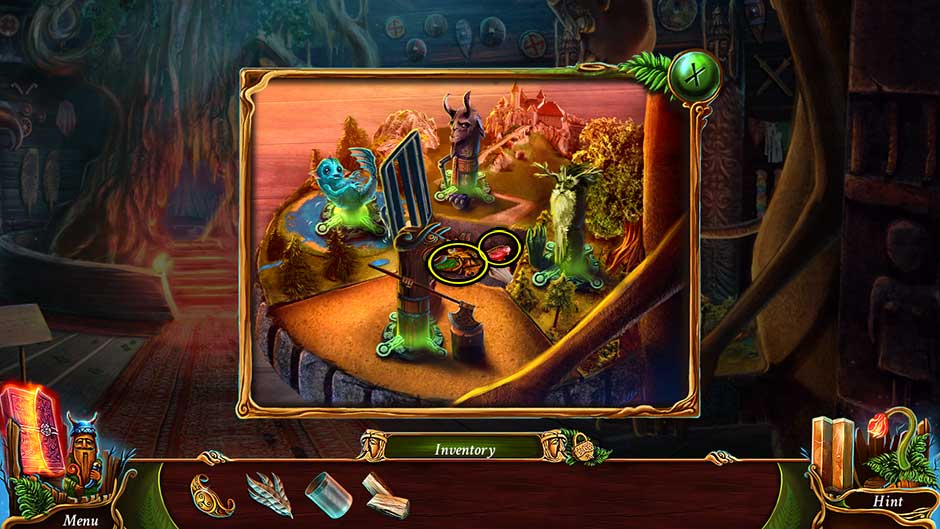
- Zoom in on the totem pole on the left. Use the Coins 2/2 on the slot, then click on the red button.
- Zoom in on the chopping block next to the totem pole and click on the Chopped Wood to add it to your inventory.
- Enter the Museum.
Museum
- Take a closer look at the lit display on the right. Place the scattered figurines into their correct slots, then use the Carved Figurine on the final slot on the left. Collect the Mask with Horns and the Fish Token from the compartment that opens.
- Go back to the Workshop.
Workshop
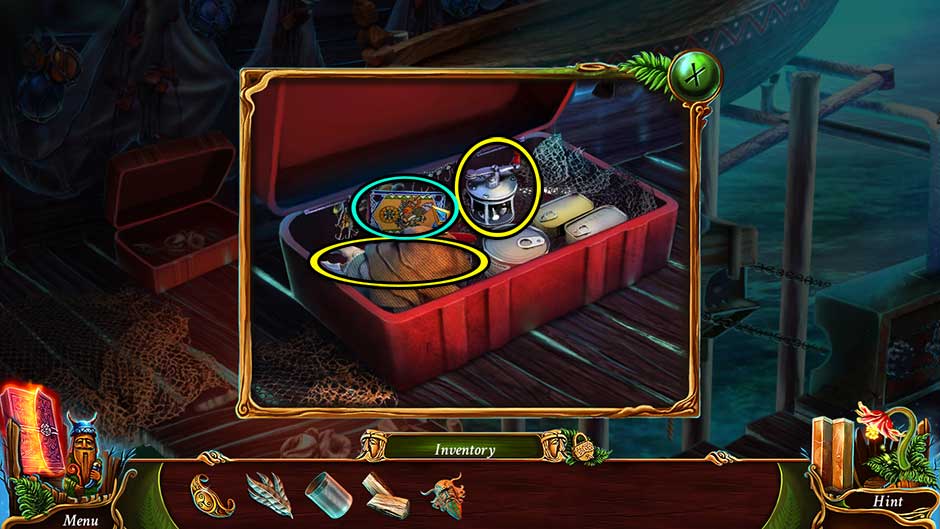
- Examine the red toolbox and place the Fish Token into the top groove. Collect the Bestiary Card 7/30, the Pliers, and the Reel
- Take a closer look at the mechanism holding the boat again. Place the Crank into the triangular hole. Tip: Leave this for now. You’ll be returning shortly.
- Exit the Workshop.
Haven
- Zoom in on the window again. Use the Fishing Line, the Pin, and the Reel on the Fishing Rod to complete it and add it to your inventory.
- Examine the end of the dock where the blue creature was previously. Use the Fishing Rod to retrieve the Broken Oar and add it to your inventory.
- Make your way back to the Square.
Square
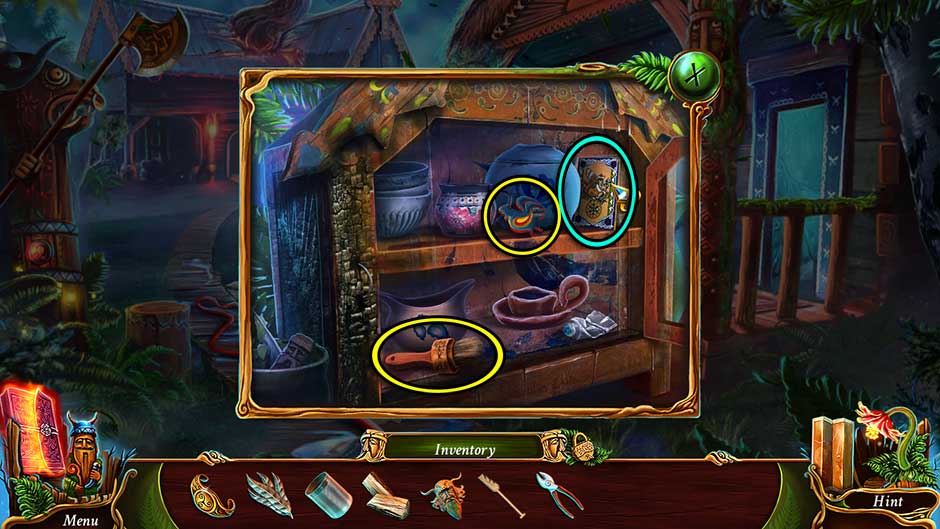
- Take a closer look at the cabinet on the far end of the porch. Use the Pliers to clip the wire, then collect the Bestiary Card 8/30, the Brush, and the Rooster Token
- Enter the Museum.
Museum
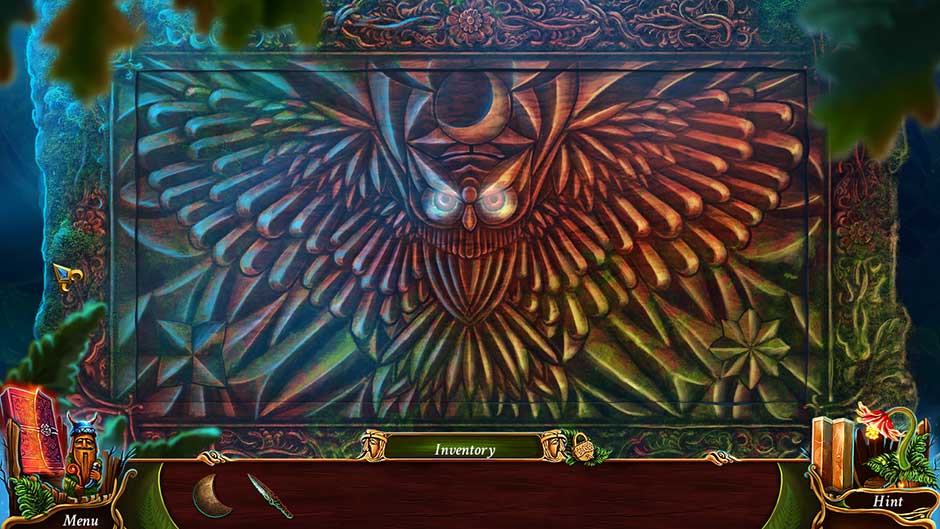
- Take a closer look at the display cabinet at the far end of the room. Place the Rooster Token into the slot toward the top of the cabinet to reveal a new portion of the case. Collect the Strange Mask inside to add it to your inventory.
- Go to the Basement.
Basement
- Give the Broken Oar to Lilacus.
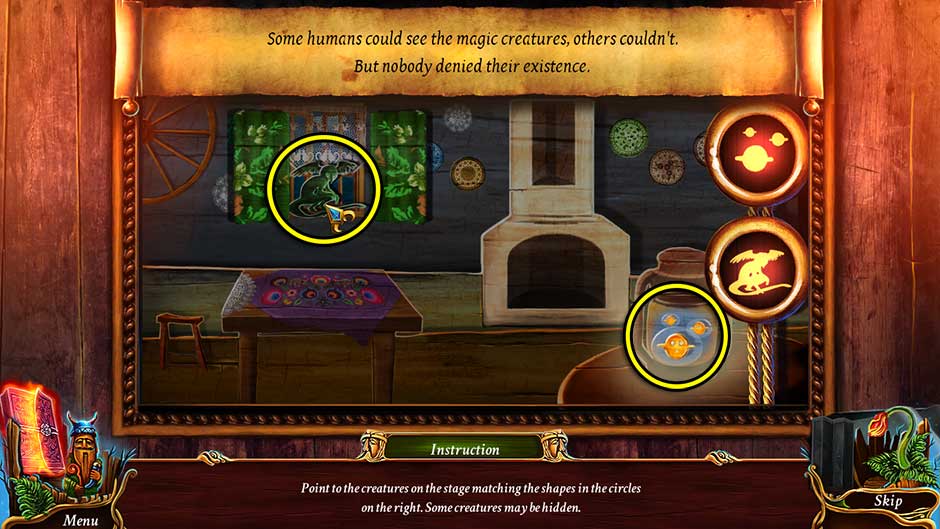
- Examine the alcove in the wall on the left. Place the Old Man Mask, the Mask with Horns, and the Strange Mask onto the proper displays to trigger a puzzle.
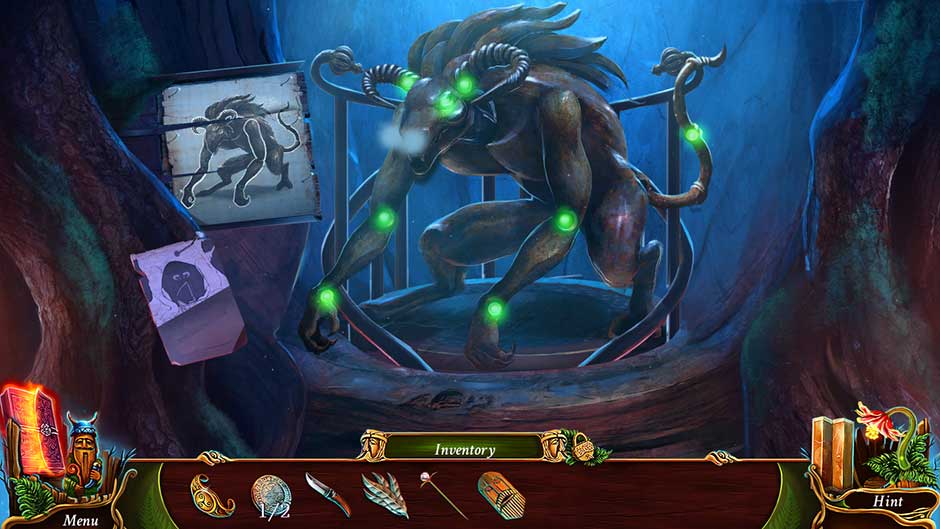
- Point to the creatures on the stage matching the shapes in the circles on the right. Some creatures may be hidden. Tip!: All creatures you will need to find have a minor shadow outline. Use this to your advantage when searching for them.
- Upon completing the puzzle, use the Ornamental Bracelet on the slot that appears. Click on the Wooden Arm to add it to your inventory.
- Take a closer look at the wooden statue toward the lower right, next to the stairs. Use the Wooden Arm on the statue and place the Chopped Wood beneath the cauldron. Click on the arm to ignite the flames, then use the Tin to collect the boiling Pitch and add it to your inventory.
- Return to the Workshop.
Workshop
- Take a closer look at the boat. Place the Pitch on the right post, then dip the Brush into it. Click and hold to paint over the cracks in the side of the boat, repairing the hole. Tip: Cover the entirety of the boarded area! The close-up will automatically be exited once you’re finished.
- Click on the mechanism in the lower right corner to lower the boat into the water.
- Exit to the Haven.
Haven
- Collect the Oar from Lilacus, then use the Oar on the boat to travel across the lake with him.
Chapter 3: Leshy’s Forest
A quiet row across the lake is short-lived as the Moth attacks once again. Lilacus is taken hostage and the world blacks out before you find yourself washed up on the opposite shore.
Beach
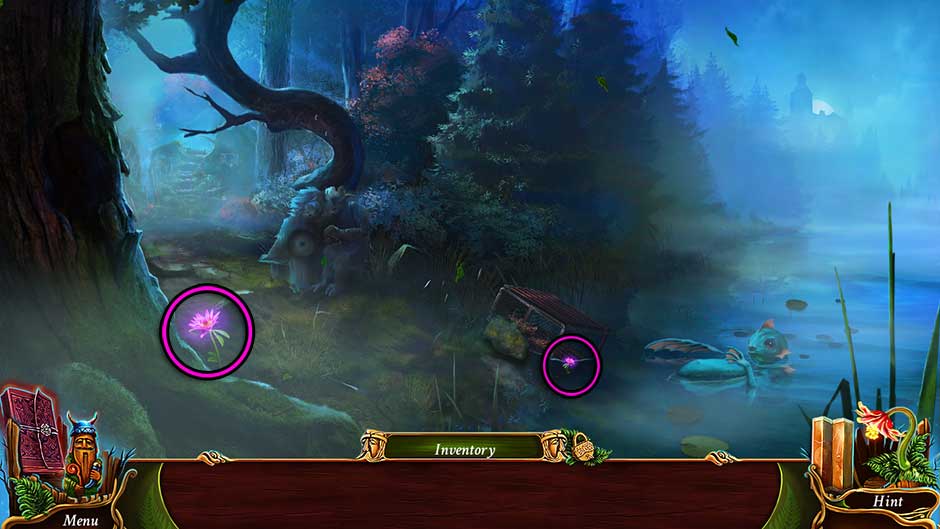
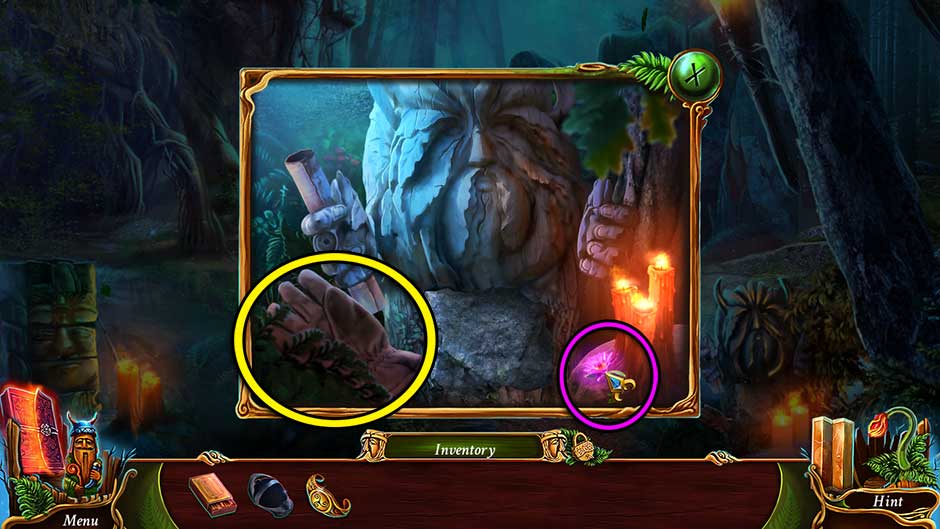
- Ethereal Flowers 8/30 and 9/30 can be found here on the Beach. Their locations are shown below. Tip: You will need to zoom in on the trap to collect the second one.
- Zoom in on the trap and remove the rock in front of it. Collect the Devil Horn to add it to your inventory.
- Speak with the creature in the water on the right. He will return the items you lost in the water: the Rainbow-hued Feathers and the Pliers.
- Examine the wooden statues ahead. Click on the Rune perched on the right statue’s arm to collect it.
- Enter the Village.
Village
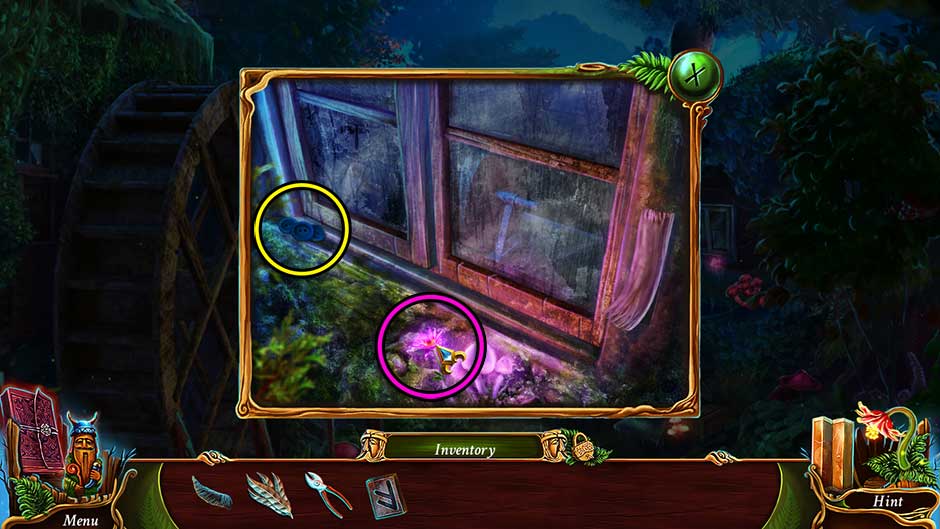
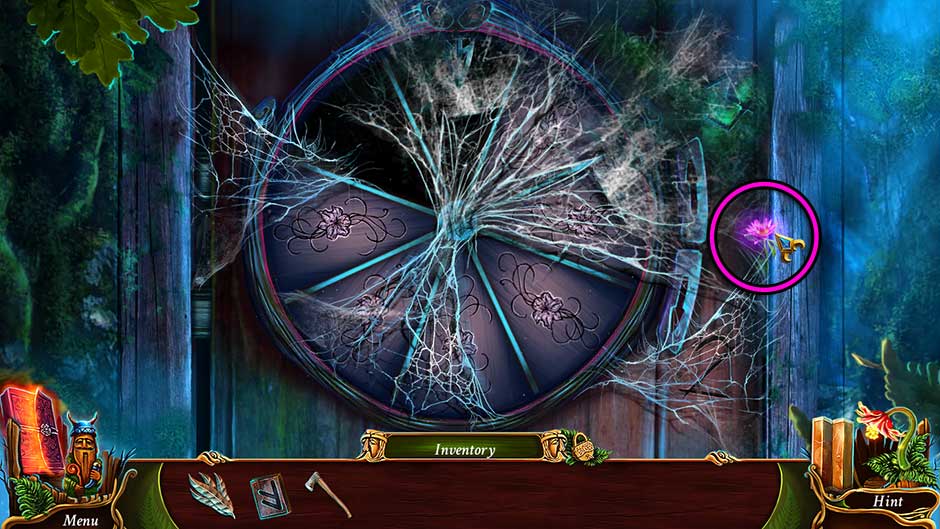
- Examine the window on the right. Use the Pliers to remove the loose panel on the right (you will return to this later). Collect the Ethereal Flower 10/30 and the Metal Button.
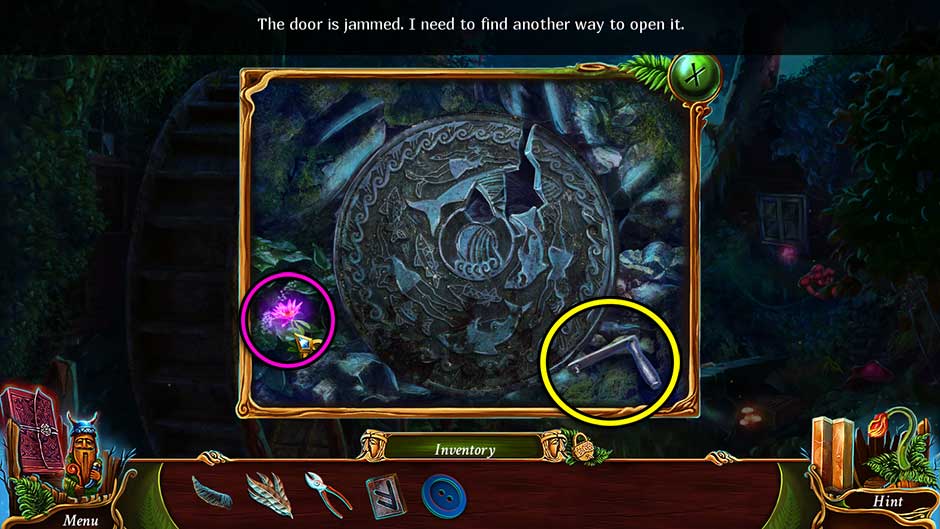
- Zoom in on the round door between the left portion of the path and the waterwheel. Collect the Ethereal Flower 11/30 and the Sharpener Handle.
- Proceed down the path to the Swamp.
Swamp
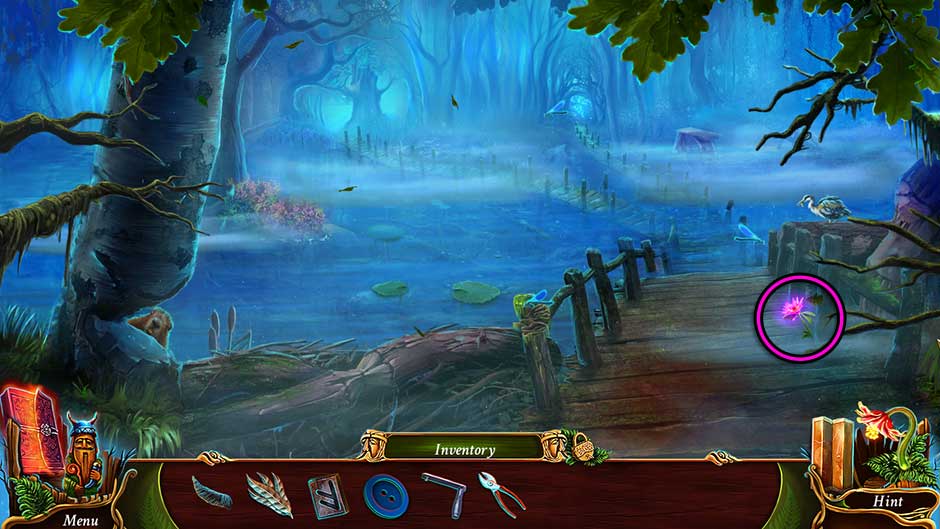
- Ethereal Flower 12/30 is on the right side of the path.
- Examine the wooden post closest to you. Use the Pliers to retrieve the Nails and add them to your inventory.
- Go back to the Beach.
Beach
- Take a closer look at the cage near the water again. Use the Metal Button to loosen the screw holding it shut, then collect the Axe Handle and the Window Part
- Enter the Village again.
Village
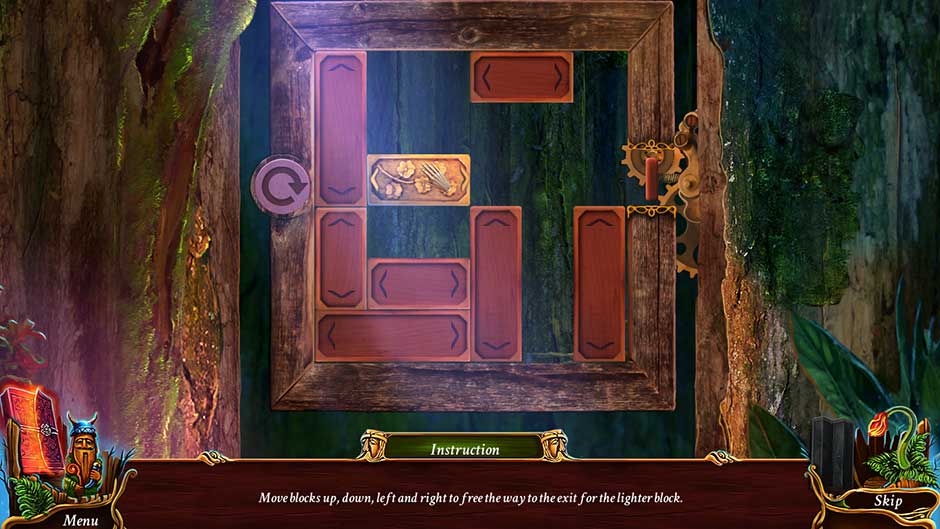
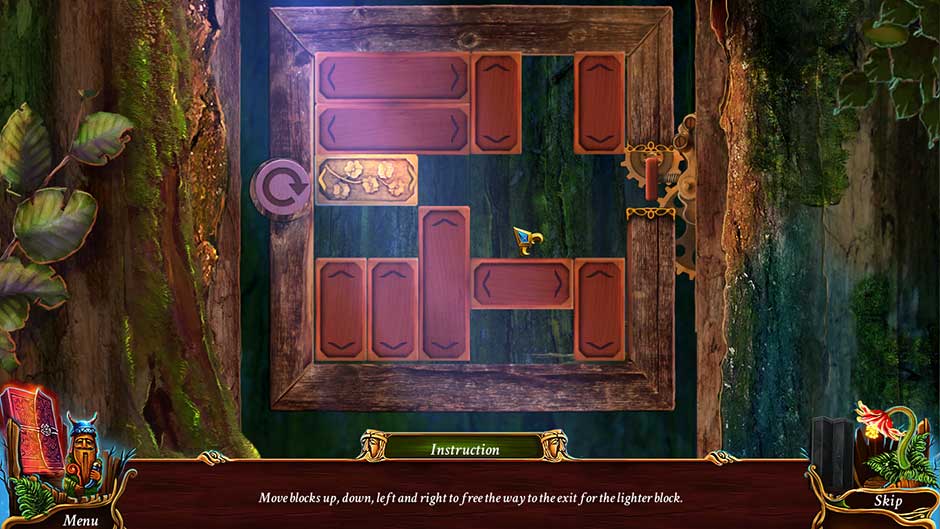
- Examine the window on the right, then the panel on the right side of the window. Use the Window Part on the panel to trigger a puzzle.
- Move blocks up, down, left, and right to free the way to the exit for the lighter block. The solutions are shown below.
- Once you’ve completed the puzzle, the window will open. Collect the Wooden Hammer sitting on the sill. Attach the Sharpener Handle to the device inside.
- Back in the main view of the Village, examine the anvil toward the lower right. Use the Axe Handle on the head sitting on top of the anvil. Zoom in on the head and place the Nails, securing them with the Wooden Hammer. Click on the Blunt Axe to add it to your inventory.
- Examine the window on the right again. Use the Blunt Axe on the sharpening wheel to acquire the Axe.
- Head forward into the Swamp.
Swamp
- Use the Axe on the fallen log on the left to break the dam.
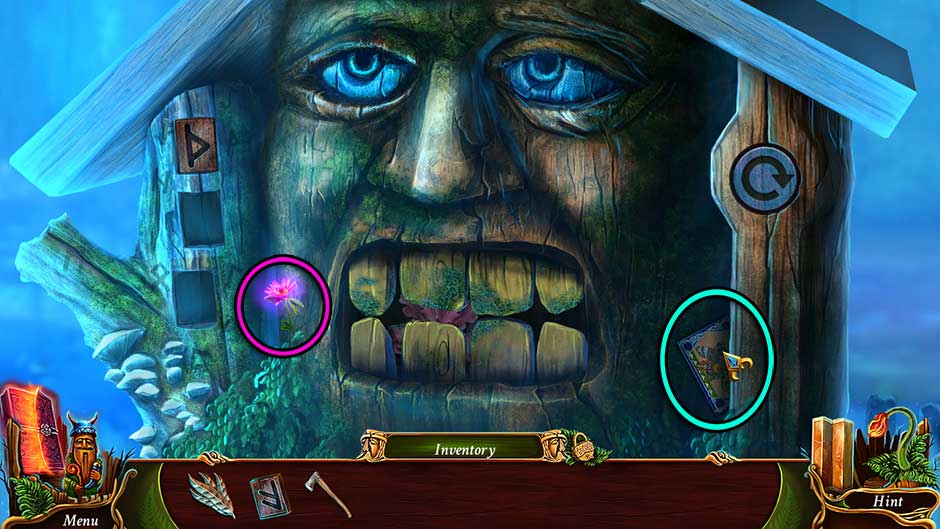
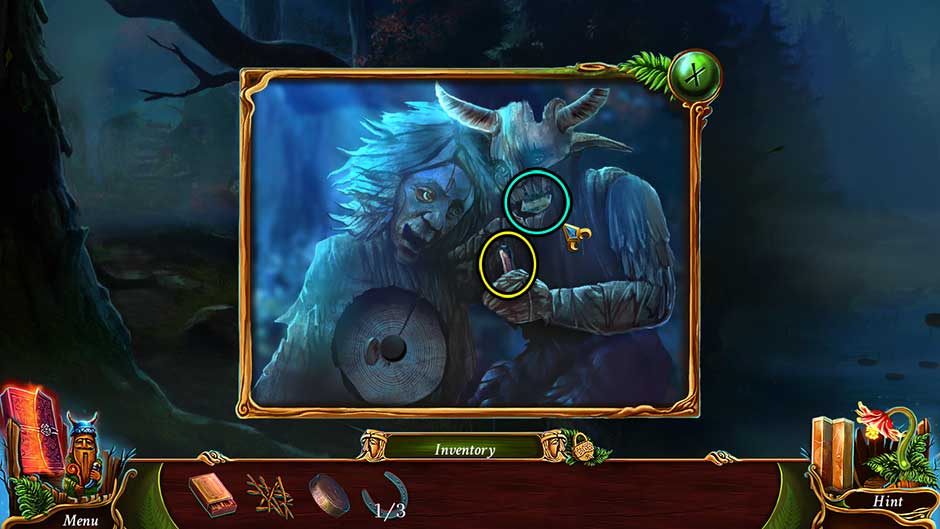
- Ahead in the distance is a carved statue on the right side of the path. Click on it for a closer view. Collect the Ethereal Flower 13/30 and the Bestiary Card 9/30.
- Follow the left fork in the path to the Outdoor area.
Outdoor
- Examine the door on the left and collect the Ethereal Flower 14/30.
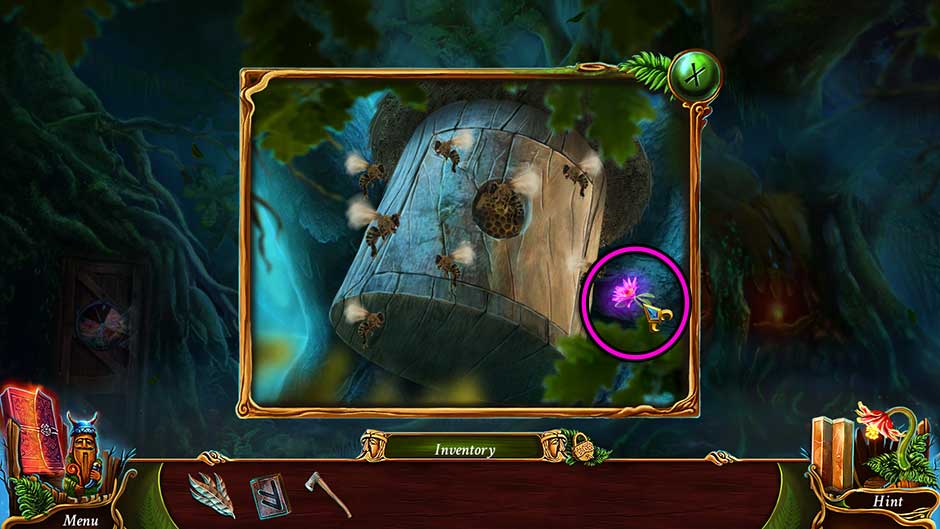
- Take a closer look at the beehive hanging from the tree ahead. Collect the Ethereal Flower 15/30.
- Examine the stump beneath the beehive. Use the Rainbow-hued Feathers on the feather duster handle to obtain the Feathers Whisk.
- Zoom in on the lit alcove on the right side of the tree. Click on the Matches to add them to your inventory.
- Examine the door on the left again and use the Feathers Whisk to clear the cobwebs. Note you cannot open this door just yet.
- Enter the Room within the tree.
Room (Tree)
- Upon entering the tree, you will encounter a short cutscene in which you speak with Leshy. Follow him up the steps to the next area.
Terrace
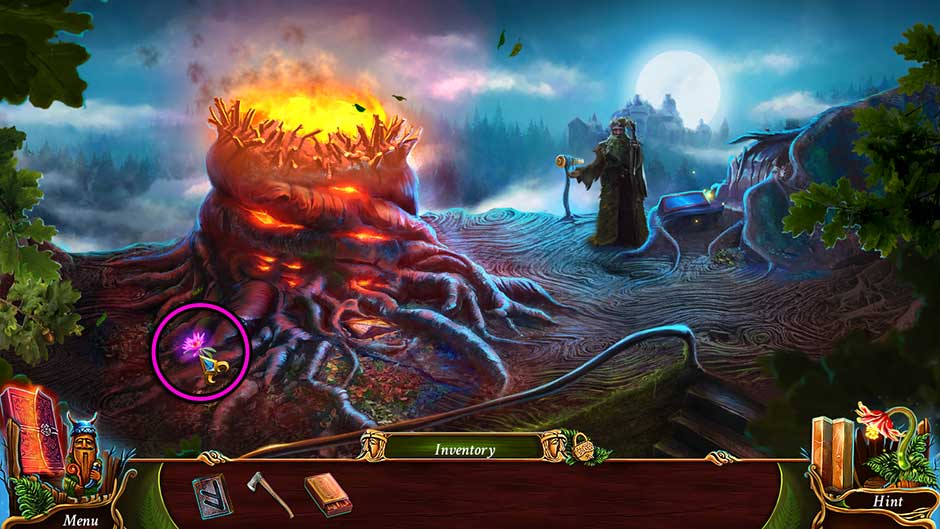
- Ethereal Flower 16/30 is within the roots of the large bonfire tree.
- Speak with Leshy, then examine the base of the tree bonfire on the left. Click on the Brushwood to add it to your inventory.
- Head back down into the Room.
Room (Tree)
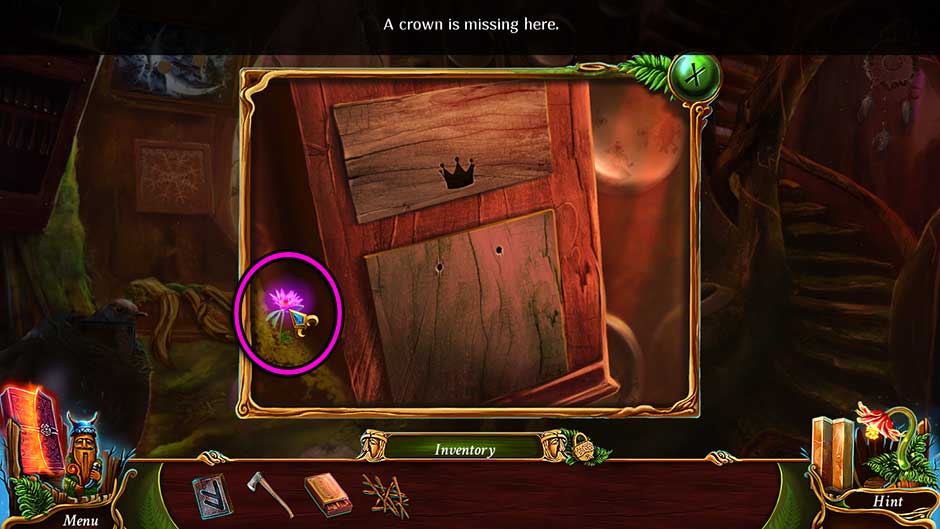
- Examine the cabinet hanging on the right side of the main pillar in the center. Collect the Ethereal Flower 17/30.
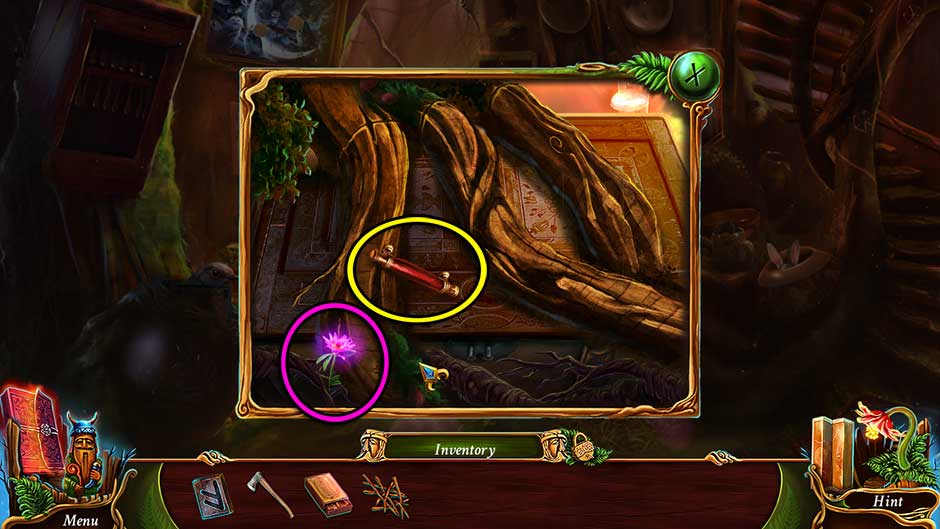
- Zoom in on the chest covered in roots beneath the paintings on the left. Collect the Ethereal Flower 18/30 and the Closet Handle.
- Use the Axe to chop away the roots covering the chest, then exit for now.
- Back in the main view of the room, you can now collect Bestiary Card 10/30 hidden in the vase on the left.
- Zoom in on the cabinet on the right side of the central pillar again. Use the Closet Handle on the bottom portion of the cabinet to open it and collect the Trunk Token and Lock Token (beneath the journal) inside.
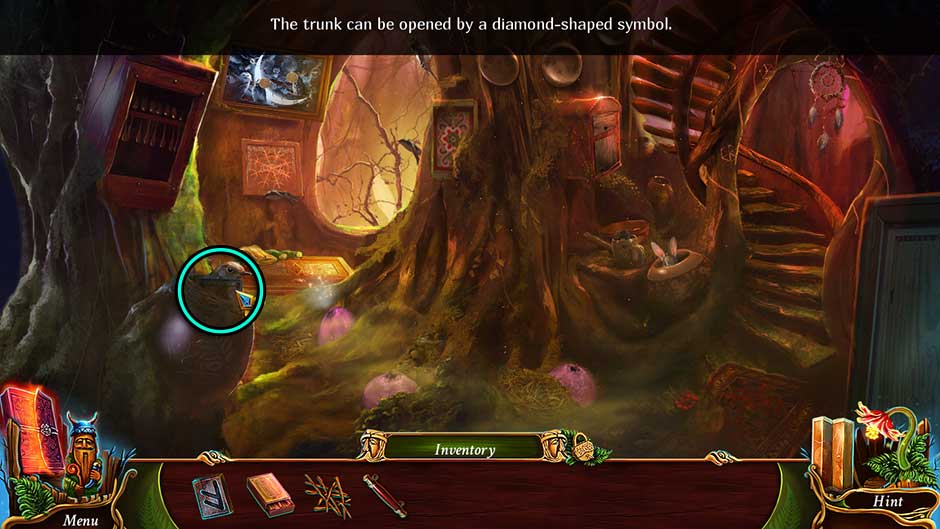
- Examine the trunk on the floor beneath the paintings on the left again. Use the Trunk Token on the slot to open it, then collect the Tile and the Rope Tip: You will return for the sickle later.
- Head back up to the Terrace.
Terrace
- Examine the base of the bonfire and place the Tile into the groove. Once removed, collect the Bestiary Card 11/30 and the Telescope Part.
- Zoom in on the telescope to the right of Leshy. Use the Telescope Part on it to trigger a puzzle.
- Click within the field of view of the telescope to move it around and find all the listed sights. Adjust the depth of view with the knob on the right.
- The first landmark is toward the mid to lower right, and requires the knob on the – sign.
- The second landmark is to the immediate upper left of the first, and requires the knob on the middle setting.
- The third landmark is to the left of the second and slightly up, and requires the knob on the + sign.
- Upon completing the puzzle, you will receive a vital clue to help you navigate the Maze.
- Exit to the Outdoor area.
Outdoor
- Head forward into the Forest Maze.
Forest Maze
- Click on the Lock Token (2) to the left of the baby boar on the right.
- Go back to the Outdoor area.
Outdoor
- Examine the door on the left. Use the Lock Token (x2) on the door to trigger a puzzle.
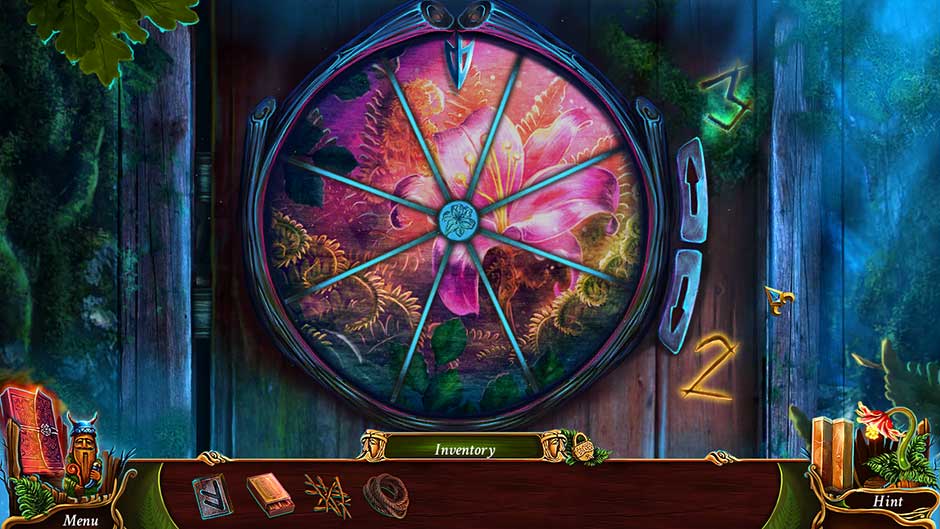
- Rotate the elements so that all pieces of the picture are visible. Upper arrow rotates picture by 3 slots. Lower arrow rotates pictures by 2 slots. To solve the puzzle, click on the bottom arrow three times, the upper arrow once, and the bottom arrow twice more. The completed solution is shown below.
- Upon completing the puzzle, click on the Rune (2) and the Planks to add them to your inventory.
- Go back to the Swamp.
Swamp
- Examine the wooden statue on the right side of the path ahead. Place the Runes (x2) into the slots on the left to trigger a puzzle.
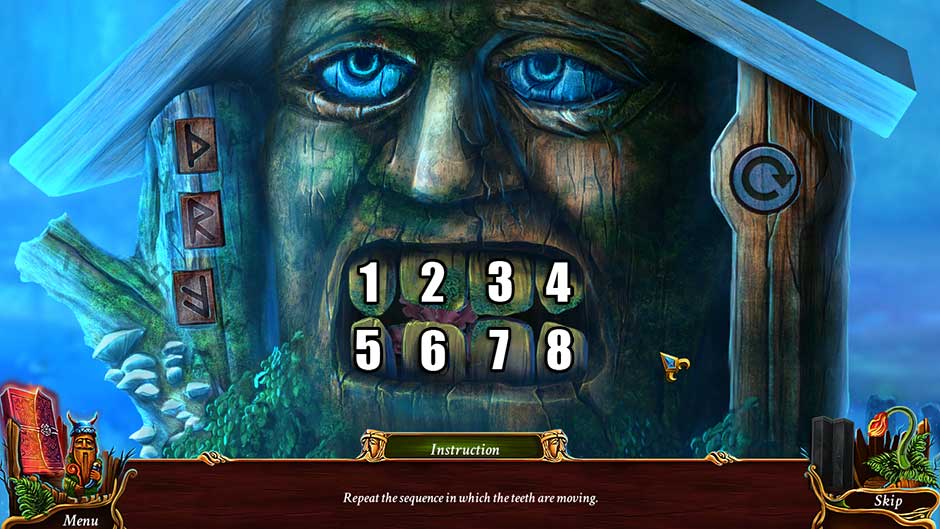
- Repeat the sequence in which the teeth are moving. There are three sequences you will need to complete to solve this puzzle. Using the screenshot below as reference, the sequence is as follows:
- Sequence One: 7, 3, 2, 5
- Sequence Two: 4, 2, 8, 1, 6
- Sequence Three: 8, 3, 6, 7, 2, 5
- Upon completing the puzzle, click on the Tree Token and the Machine Disk to add them to your inventory.
- Examine the flowers on the left bank. Use the Planks to reach this area. A hidden object scene will appear.
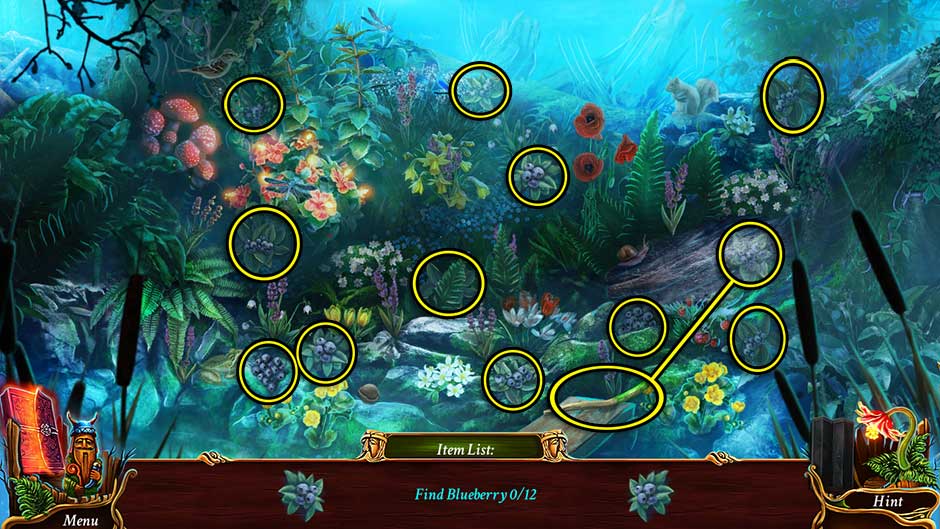
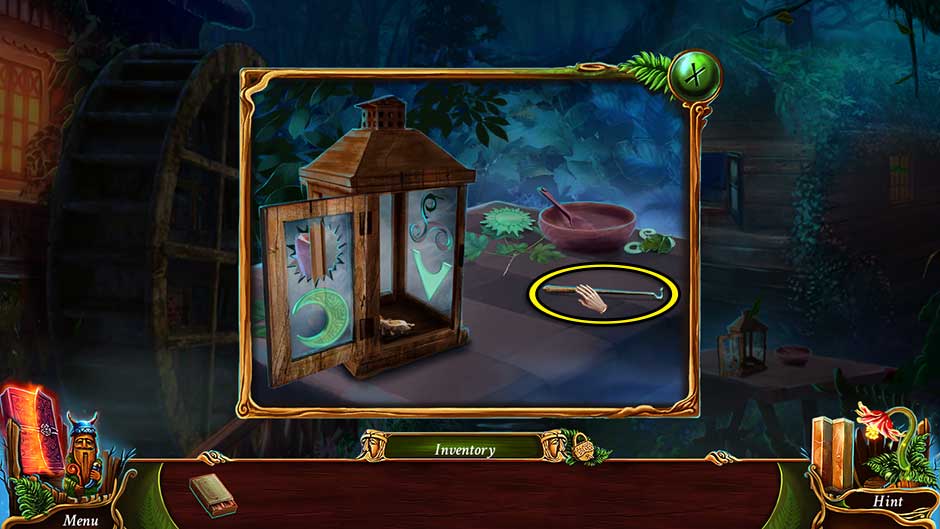
- Find all the Blueberries hidden throughout the area. Their locations are shown below. You will need to use the stick to clear away the spider web obstructing one of the blueberries.
- Once completed, the Blueberries will be added to your inventory.
- Return to the Forest Maze.
Forest Maze
- Give the Blueberries to the adult boar to encourage them to leave the area.
- It’s time to navigate the maze!:
- Click on the moss obstructing the symbols on the upper left and lower right of the tree straight ahead. Once cleared, take the Left path.
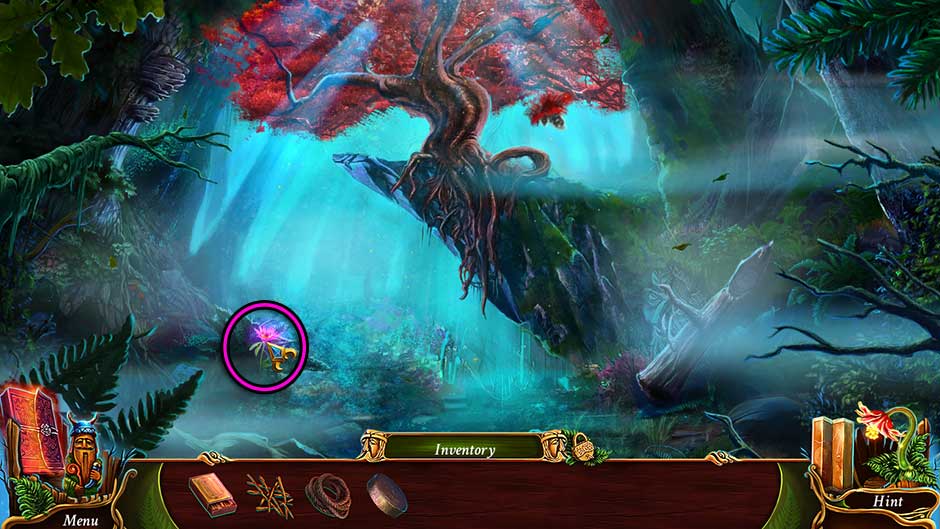
- Click on the branch on the right to lower it, revealing the second symbol. Collect Ethereal Flower 19/30 before proceeding down the path to the Left.
- Click on the bush on the left, then clear the moss from the bottom left and right corners of the tree ahead. Collect Ethereal Flower 20/30 before taking the Right path.
- Congratulations, you made it to the end of the maze! Collect Ethereal Flower 21/30 and Bestiary Card 12/30 on the left.
- Zoom in on the gate on the right. Use the Tree Token to open the gate lock, triggering a puzzle.
- Connect the lines of the same color by rotating the pieces. The solution is shown below.
- Once the puzzle is completed, the gate will open. Proceed through to the next area.
Tree
- Ethereal Flower 22/30 is on the left.
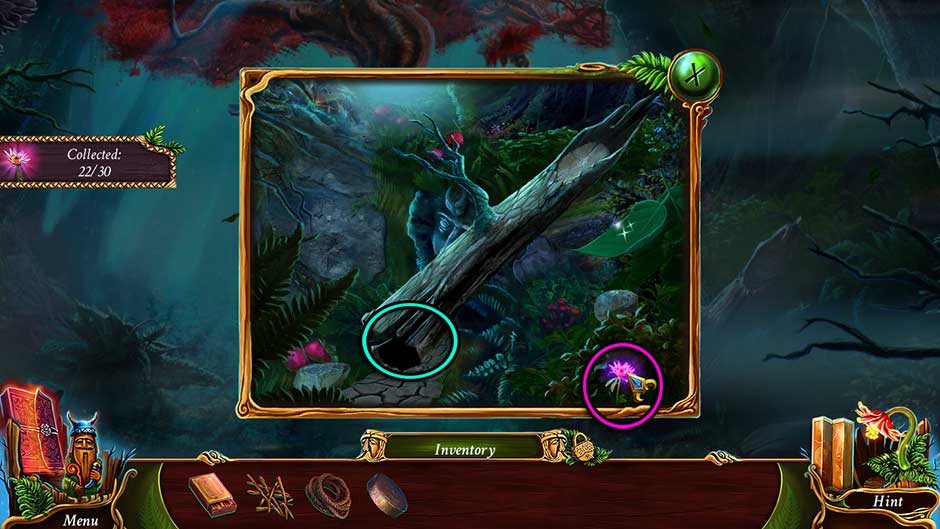
- Examine the log propped up on the right. Ethereal Flower 23/30 is in the lower right corner and Bestiary Card 13/30 is hidden beneath the log. Click on the stones on the right and lower left corner to counterbalance the log. Then use the leaf on the right to gather water, adding the Leaf with Water to your inventory.
- Back in the main view of the area, examine the roots of the tree straight ahead. Use the Leaf with Water on the roots to grow a ladder, then click for a closer view.
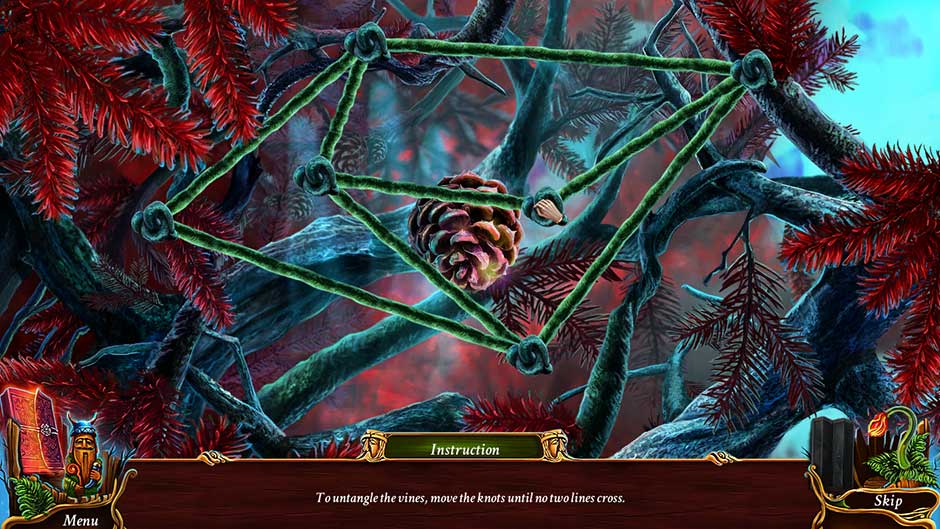
- To untangle the vines, move the knots until no two lines cross. The solution is shown below.
- Before you can collect the prize, you will need to backtrack a bit. Head back to the Village.
Village
- Examine the round disk between the path and the waterwheel. Use the Rope to fasten it to the disk.
- Back in the main view of the area, click on the hook on the end of the rope to attach it to the waterwheel, causing the round door to open. Zoom in on it again.
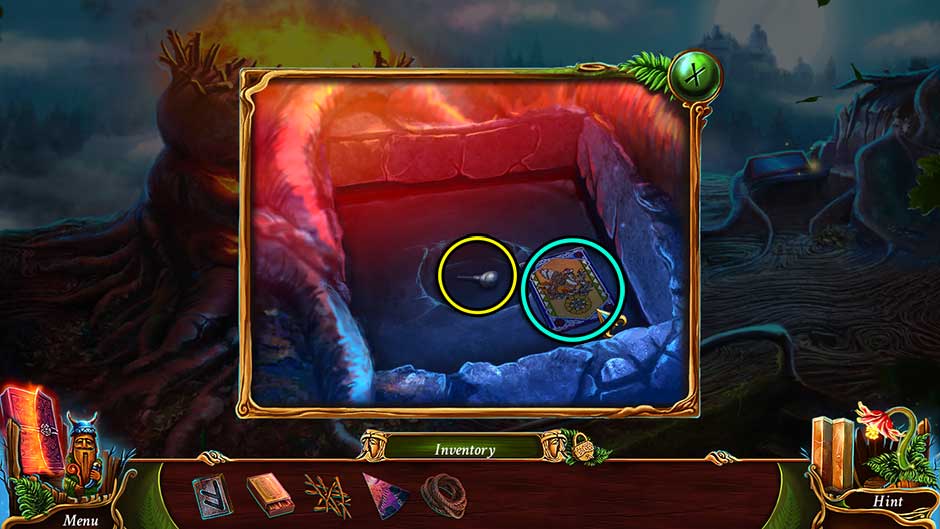
- Click on the Devil Horn (2) and the Horseshoe Token 1/3 to add them to your inventory.
- Go back down to the Beach.
- Beach
- Examine the wooden statues here.
- Place the Devil Horns (x2) onto the right statue.
- Collect the round token that appears and place it into the center of the circular groove on the left statue.
- Click on the Eye piece revealed inside and restore it to the socket of the left statue.
- Collect the piece from the left statute’s mouth and use it on the right statue to cause the hand to open.
- Finally, collect the Bestiary Card 14/30 and the Sickle Handle.
- Make your way back to the Room (Tree).
Room (Tree)
- Take a closer look at the chest beneath the paintings on the left again. Use the Sickle Handle on the head within the box to obtain the completed Sickle.
- Now you can finally harvest your prize! Return to the Tree.
Tree
- Examine the ladder straight ahead and use the Sickle to acquire the Pine Cone.
- Return to the Terrace.
Terrace
- Throw the Pine Cone into the bonfire on the left. After a brief cutscene, Leshy will give you the Fire Key.
Chapter 4: Tubber
The fire has spoken, and with Leshy’s help, you learn to seek out the mysterious Tubber, who can help you tame the Moth.
Terrace
- Examine the case to the right of the telescope. Use the Fire Key on the indentation. This will trigger a hidden object scene.
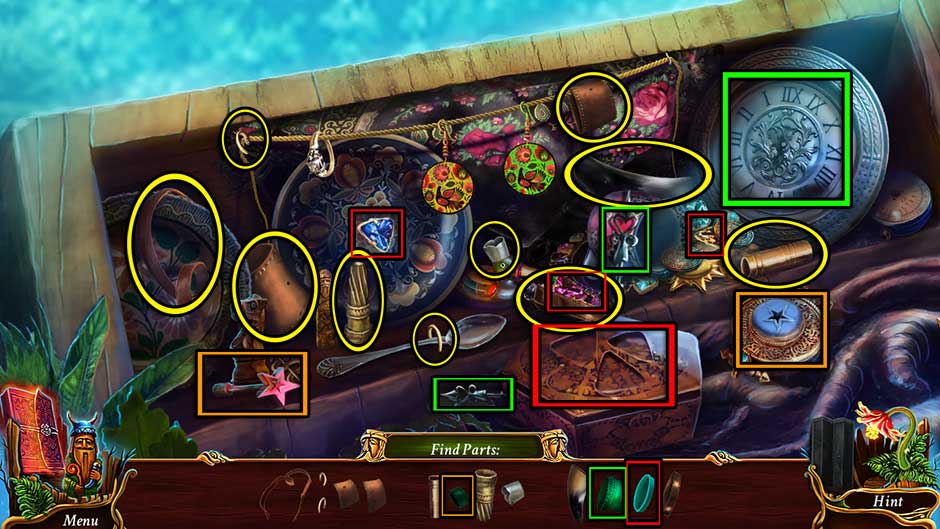
- Find the items shown at the bottom of the screen. Their locations are circled below. In order to reach the items shown in blue, you will need to open the containers which house them. The items needed, and their applicable containers, are outlined with colored squares.
- Upon completing the area, the Horn will be added to your inventory.
- Make your way down to the Swamp.
Swamp
- Examine the end of the right fork in the path ahead. Use the Horn to open the door.
- Enter through to the next area.
Lodge
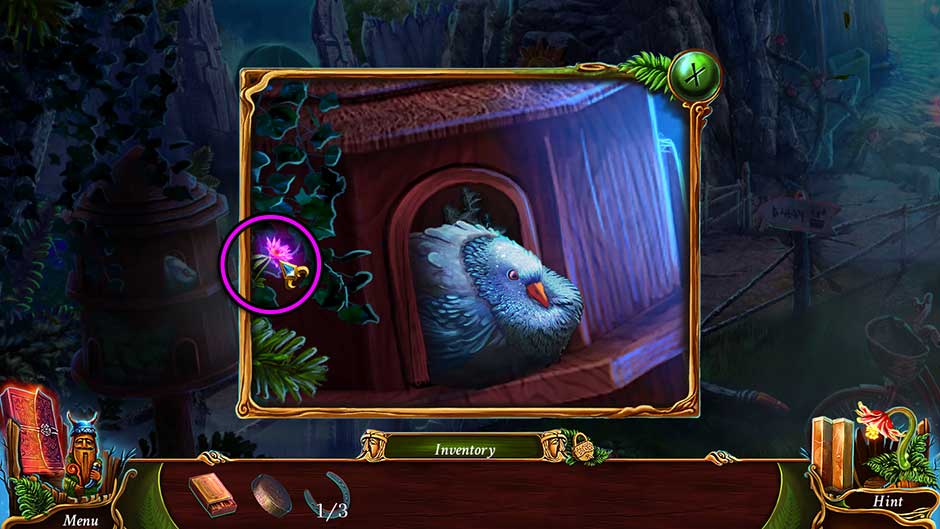
- Take a closer look at the round birdhouse on the left. Ethereal Flower 24/30 is on the left.
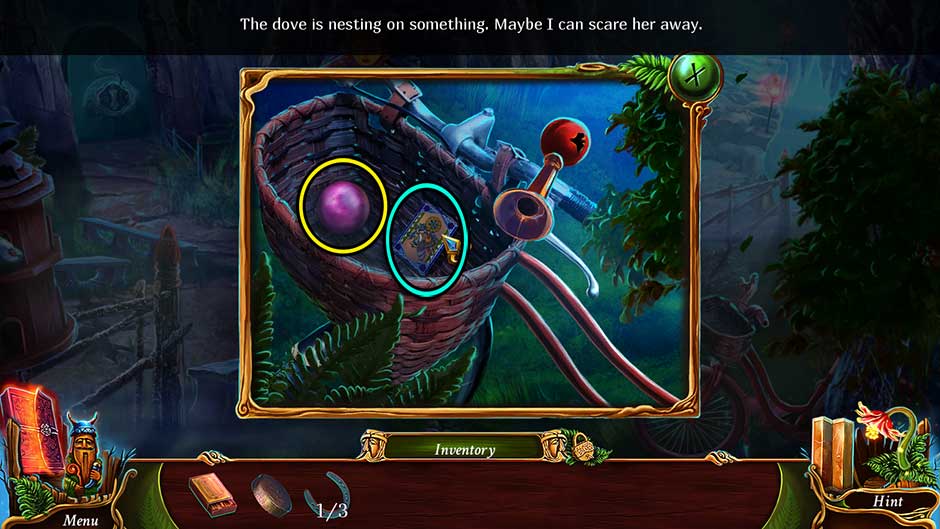
- Examine the bicycle on the right. Collect the Bestiary Card 15/30 and the Gate Part.
- Zoom in on the keg to the bottom right of the door ahead. Click on the Doorbell Part lying to the left of it to add it to your inventory.
- Head up the path to the right.
Rocks
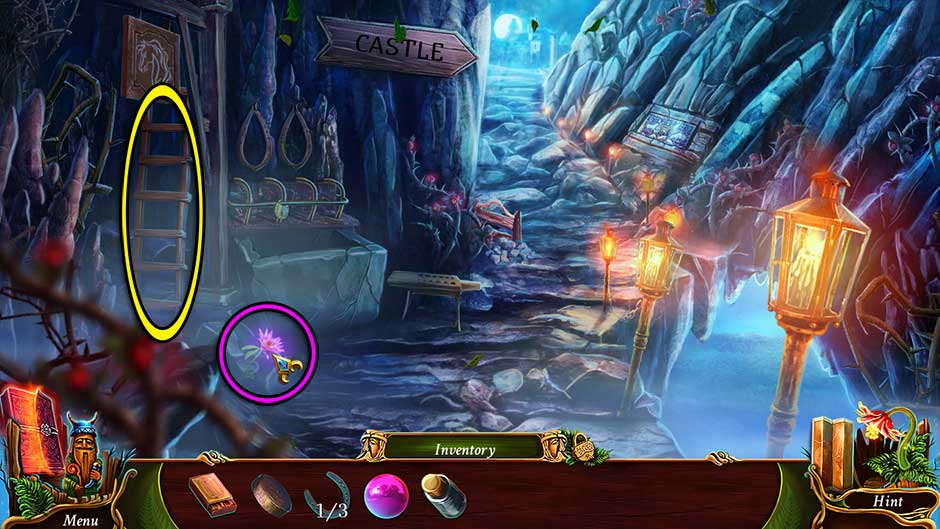
- Ethereal Flower 25/30 is on the lower left. Click on the Ladder on the left to add it to your inventory.
- Examine the small stand straight ahead. Collect the Wolf Token 1/3 sitting on the rock on the bottom right.
- Head up the path to the Ward.
Ward
- Collect the Shovel to the right of the path.
- Head back down to the previous area.
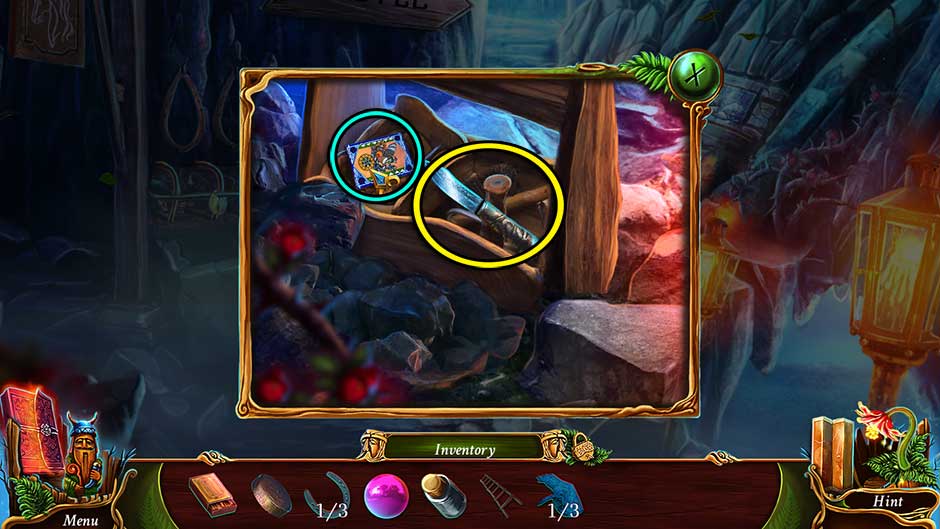
Rocks
- Examine the small stand straight ahead again. Use the Shovel to clear away the rocks, then collect the Bestiary Card 16/30 and the Knife.
- Head back down to the Lodge.
Lodge
- Examine the door straight ahead. Use the Knife to remove the plate, then place the Doorbell Part into the hole. Click to ring the doorbell.
- Enter through the open door into the next area.
Living Room
- Speak with Tubber. He will give you the Soap.
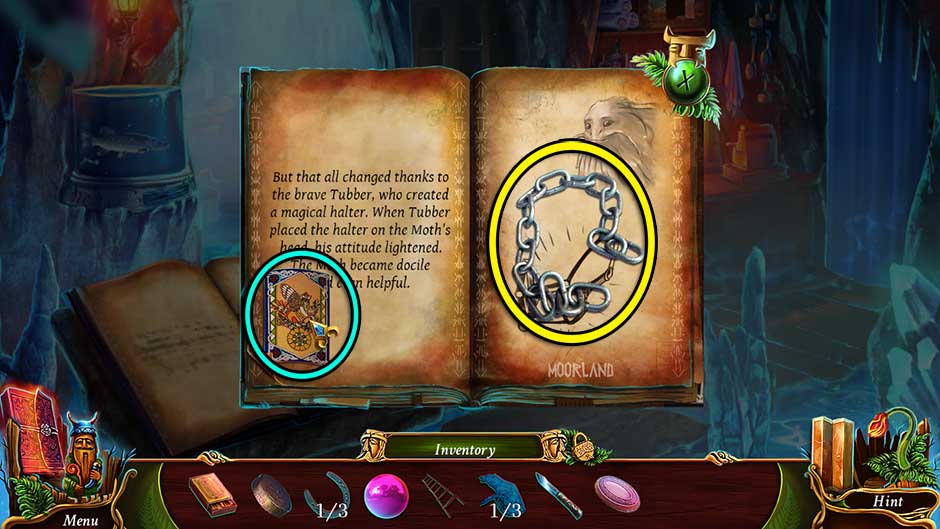
- Examine the book on the stand on the left. Click on the bottom right corner of the pages to turn them. Collect the Bestiary Card 17/30 and the Chain nestled within the pages.
- Take a closer look at the top of the shelf behind the register counter. Click on the Corkscrew in the upper left corner to add it to your inventory. Tip: You will be returning here later for a puzzle!
- Zoom in on the counter where the cash register sits. Use the Corkscrew to remove the cork from the glass jar and collect the Nuts
- Go outside.
Lodge
- Use the Ladder to the left of the door and take a closer look at the vent up top. Attach the Chain to the existing links and click to pull the vent cap open.
- Enter the Lodge again.
Living Room
- Proceed forward into the next chamber.
Bathroom
- Zoom in on the lantern on the upper left. Click on the charm attached to the chain to open the exhaust vent, causing the steam to drain from the room.
- Take a closer look at the fountain on the left. Click on the Poker to add it to your inventory.
- Place the drawer sitting next to the grinder into the device, then exit the close-up for now.
- Examine the alcove in the upper right corner. Click on the Latex Glove sitting in front of the oven to add it to your inventory, then use the Poker to retrieve the Owl Token 1/2 and add that to your inventory as well.
- Click on the purple sheet hanging over the wall straight ahead to remove it, then zoom in for a closer view. Click on the gold Bath Knob shaped like a hummingbird on the left to collect it.
- Back in the main area, examine the decorative stones in the upper left corner of the round tub. Collect the Bestiary Card 18/30 and the Strainer.
- Head back down into the Living Room.
Living Room
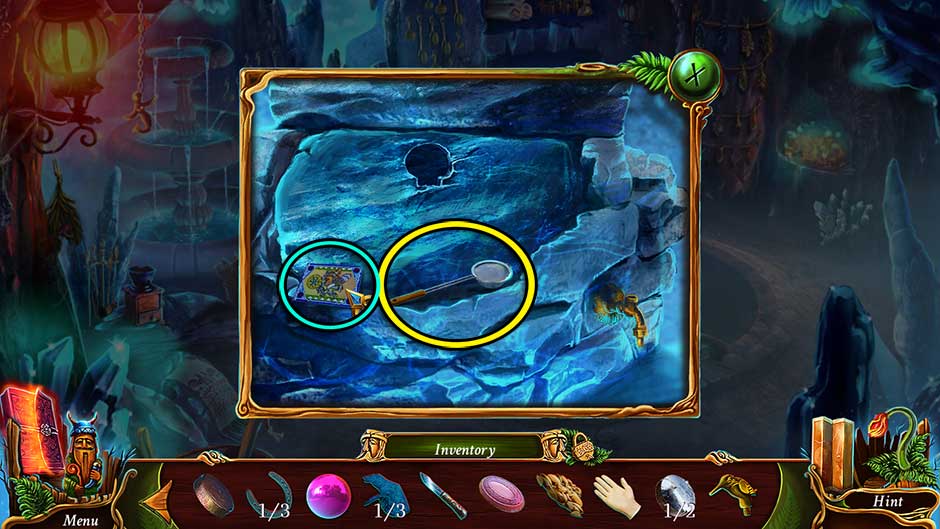
- Take a closer look at the fish tank on the left. Use the Strainer to retrieve the Cashregister Handle from inside the tank and add it to your inventory.
- Zoom in on the cash register on the right. Place the Cashregister Handle on the cash register and click to open it. Collect the Aquarium Token from the teller drawer.
- Examine the fish tank on the left again. Place the Aquarium Token into the slot to open a secret compartment. Collect the Crown Token and the Grinder’s Crank from within.
- Go back into the Bathroom.
Bathroom
- Take a closer look at the fountain area on the left again. Restore the Grinder’s Crank to the top of the grinder again, then place the Nuts into the grinder. Click to grind them, opening the bottom drawer to collect the Grinder Nuts.
- Backtrack to the Room (Tree).
Room (Tree)
- Examine the cabinet on the right side of the central pillar. Place the Crown Token into the slot to open it, then collect the Owl Tokens 2/2
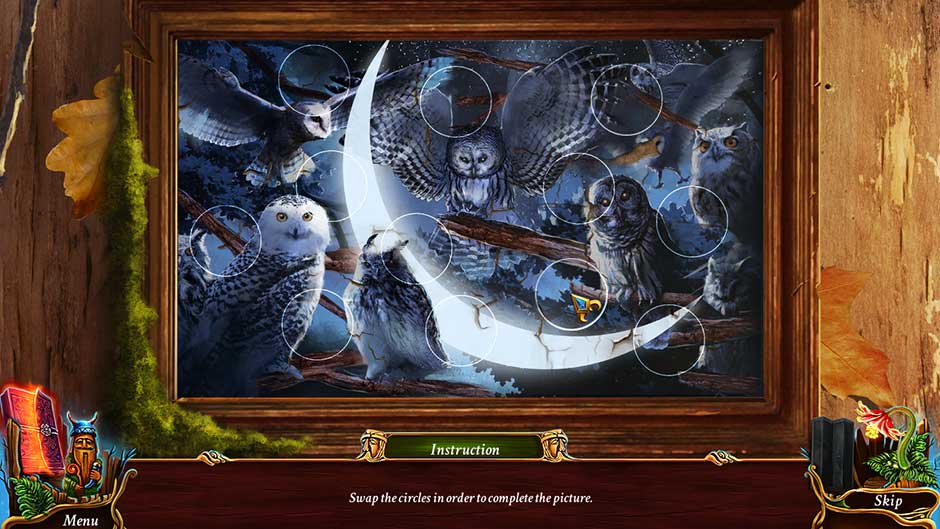
- Back in the main area, examine the painting hanging on the upper left. Place the Owl Tokens 2/2 into the slots to trigger a puzzle.
- Swap the circles in order to complete the picture. The completed solution is shown below.
- Upon completing the puzzle, remove the debris and click on the Aurochs to add it to your inventory.
- Return to the Lodge.
Lodge
- Take a closer look at the bike on the right again. Use the Latex Glove on the horn to repair it, then click to add the Trumpet to your inventory.
- Zoom in on the birdhouse on the left. Use the Trumpet to scare away the dove, then click on the Deer to add it to your inventory.
- Head back to the Outdoor area.
Outdoor
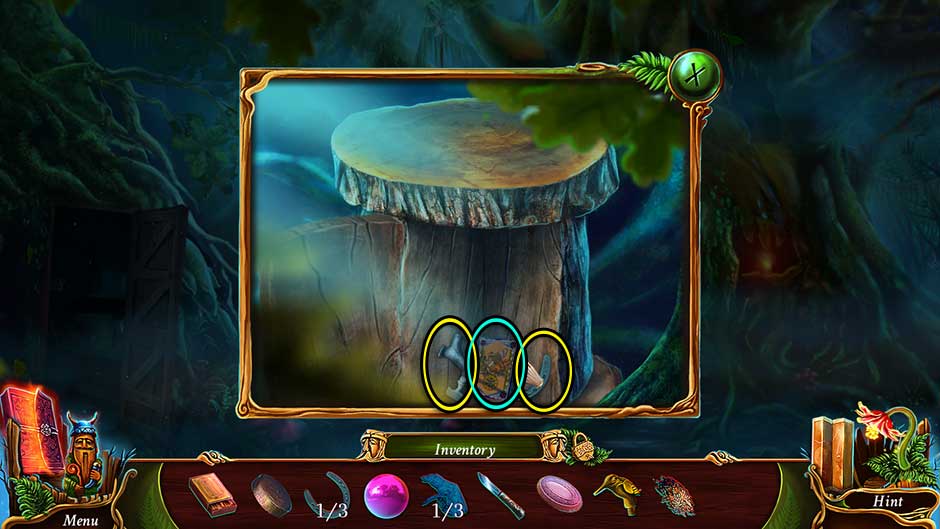
- Examine the stump beneath the bee hive. Place the Aurochs and the Deer into the slots, then click on the stump to open a secret compartment. Collect the Bestiary Card 19/30, the Tap, Horseshoe Tokens 2/3.
- Head back to the Swamp.
Swamp
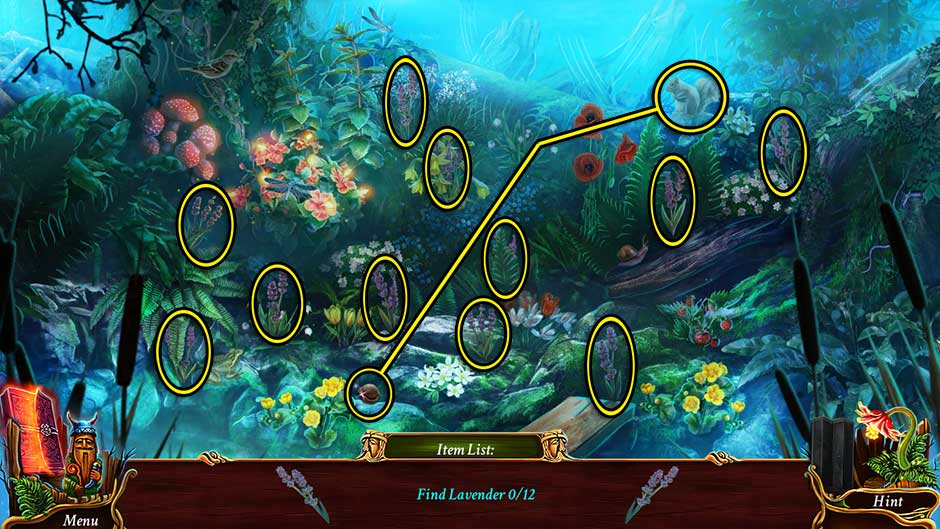
- Click on the hidden object area over the flowers on the left. Find 12 shoots of Lavender Their locations are shown below. You will need to give the nut to the squirrel to reveal the final shoot.
- Upon completing the area, the Lavender will be added to your inventory.
- Head back to the Lodge.
Lodge
- Take a closer look at the keg to the lower right of the door. Place the Tap on the keg and click to run the water. Collect the Soap Key from beneath the grate to add it to your inventory.
- Enter the Lodge.
Living Room
- Take a closer look at the cabinet straight ahead. Use the Soap Key on the lock to open it, then collect the Horseshoe Tokens 3/3, and the Bath Milk. You may also read the note about Charms.
- Head back into the Bathroom.
Bathroom
- Examine the decorative rocks at the top of the pool. Place the Bath Knob onto the golden spigot on the right, then click to turn on the water.
- Backtrack to the Village.
Village
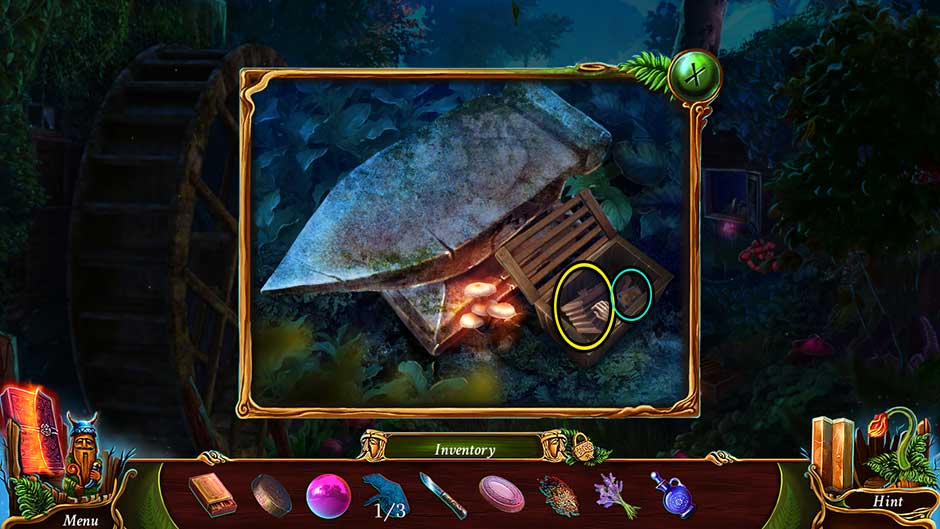
- Examine the anvil on the lower right. Place the Horseshoe Tokens 3/3 into the slot on top of the wooden crate. Click to open it and collect the Bestiary Card 20/30 and the Bellows.
- Return to the Outdoor area.
Outdoor
- Take a closer look at the lit alcove on the right. Place the Brushwood into the bee smoker, then attach the Bellows and use the Matches. Click to acquire the Beesmoker.
- Zoom in on the bee hive straight ahead. Use the Beesmoker to calm the bees, then open the front of the hive and collect the Honey
- Make your way back to the Bathroom.
Bathroom
- Examine the shelves straight ahead at the back of the room. Use the Bath Milk, the Honey, the Grinder Nuts, the Lavender, and the Soap on the mixture. Click on the wooden spoon on the upper right to stir them altogether and trigger a minigame.
- In this game you need to separate the floating items from each other. Do this by clicking and holding on an item, then moving it to another location in the cauldron. Items will continue to free-float as you do this, so it may take a few attempts. Items which are colored in red are too close to another item. Upon completing the puzzle successfully, you will obtain the Mixture.
- Back in the main area, use the Mixture on the bath.
- Speak with Tubber. He will give you the Horse Key.
- Make your way back to the Rocks area.
Rocks
- Take a closer look at the tool rack beneath the Castle sign. Use the Horse Key on the lock to open it and trigger a hidden object scene.
- Find the items displayed at the bottom of the screen. Their locations are shown below. Upon completing the area, the Magic Halter will be added to your inventory.
- Proceed up the path to the next area.
Ward
- A cutscene will occur in which Tubber distracts the Moth. Use the Magic Halter on the Moth on the left to tame him.
- Take a closer look at the rock next to the torch straight ahead. Collect Ethereal Flower 26/30, the Bestiary Card 21/30, and the Machine Disk (2).
- Examine the dummy to the right of the tower on the left. Use the Knife to cut the stitching over the eye, then collect the Wolf Tokens 2/3 and the Sea Shell to add them to your inventory.
- Make your way back to the Living Room.
Living Room
- Take a closer look at the top of the shelf behind the cash register. Place the Machine Disks (x2) into the empty slots to trigger a puzzle.
- Rotate the disks so they form a picture. The solution is shown below.
- Upon completing the puzzle, click on the Arrows to add them to your inventory.
- Enter the Bathroom.
Bathroom
- Examine the decorative rocks next to the pool from which the water flows. Place the Sea Shell into the indentation, then click on the Bow inside to add it to your inventory.
- Return to the Ward.
Ward
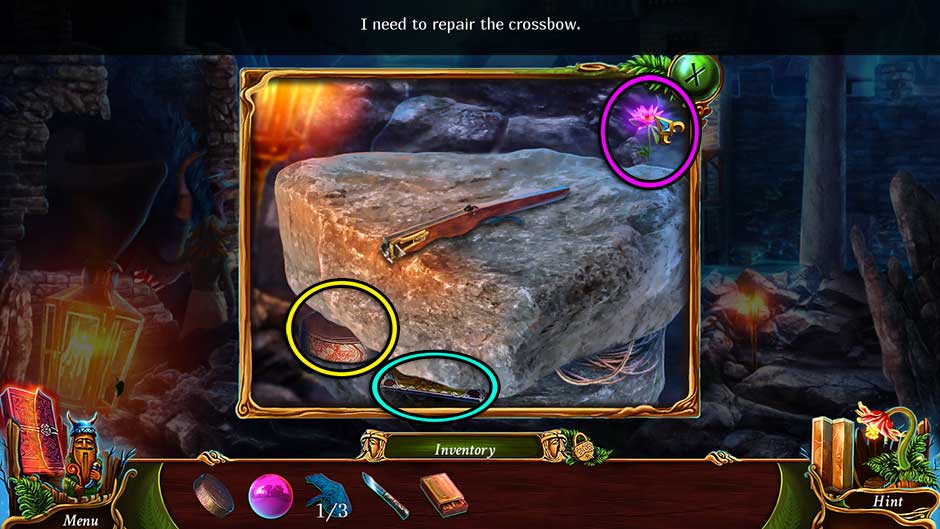
- Examine the rock next to the torch again. Place the Bow and the Arrows on the rock. Click on the string beneath the bottom right corner of the rock and use it on the pieces to assemble the Crossbow and add it to your inventory.
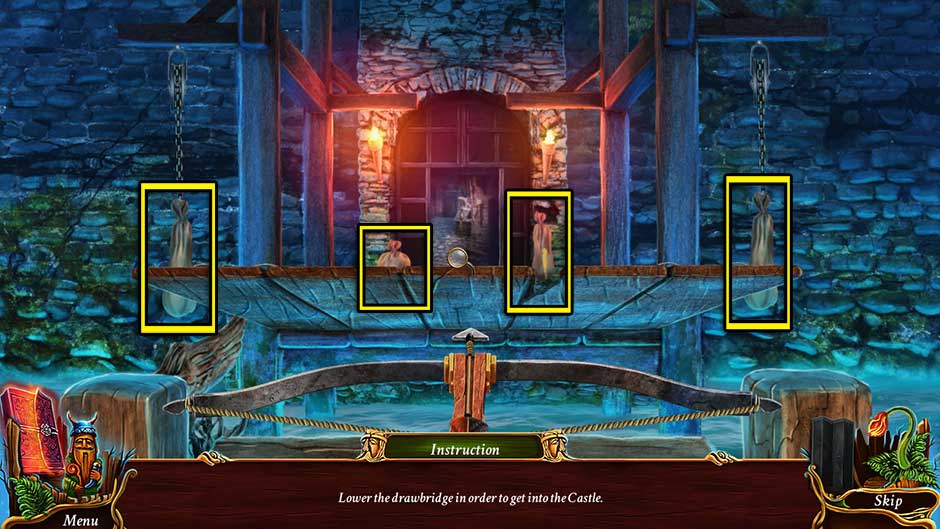
- Zoom in on the drawbridge ahead. Use the Crossbow to trigger a puzzle.
- Lower the drawbridge in order to get into the Castle. Click on suspended sandbags and shoot them in order to drain them of sand, lowering the bridge. The locations of the sandbags are shown below.
- Once the drawbridge is lowered, proceed forward into the Courtyard.
Chapter 5: Boruta’s Castle
With the Moth defeated, you can now enter the Castle. Locate Lilacus and confront Boruta before it’s too late!
Courtyard
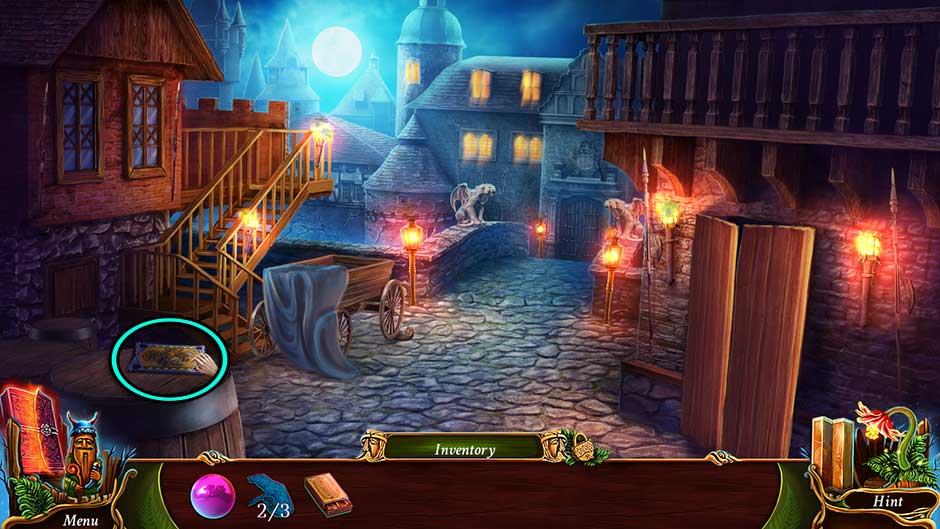
- Click on the purple fabric on the left to remove it. Collect the Bestiary Card 22/30
- Click on the wooden doors on the right to open them. Tip: You will return to this area soon. For now, click on the white cloth draped over the cart ahead.
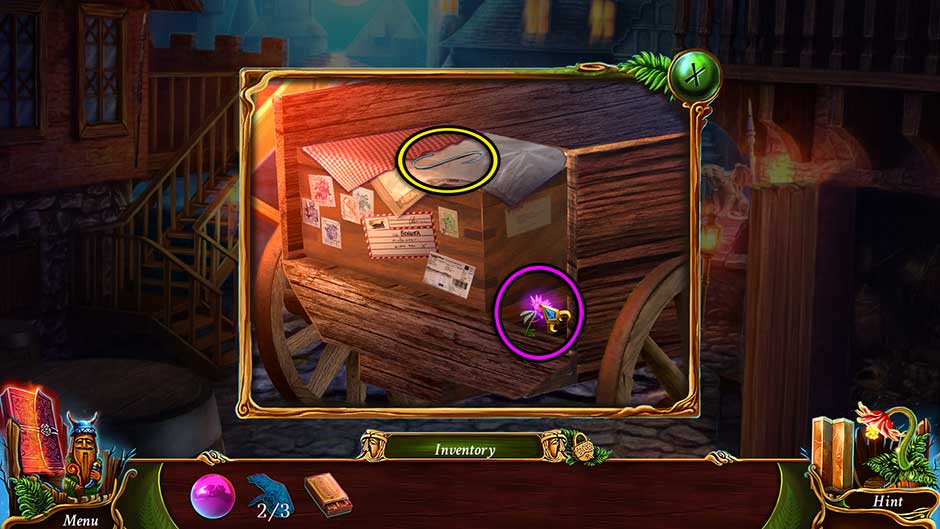
- Take a closer look at the wooden cart ahead. Collect Ethereal Flower 27/30 and the Hook. Remove the remaining fabrics stacked on top of the box, then exit the closeup for now.
- Examine the far right cart wheel. Note the blocked wheel. Click on the Skewer stuck in the wheel on the upper left to add it to your inventory.
- Zoom in on the cobblestone bridge straight ahead. Click on the Oil Lamp on the right to add it to your inventory.
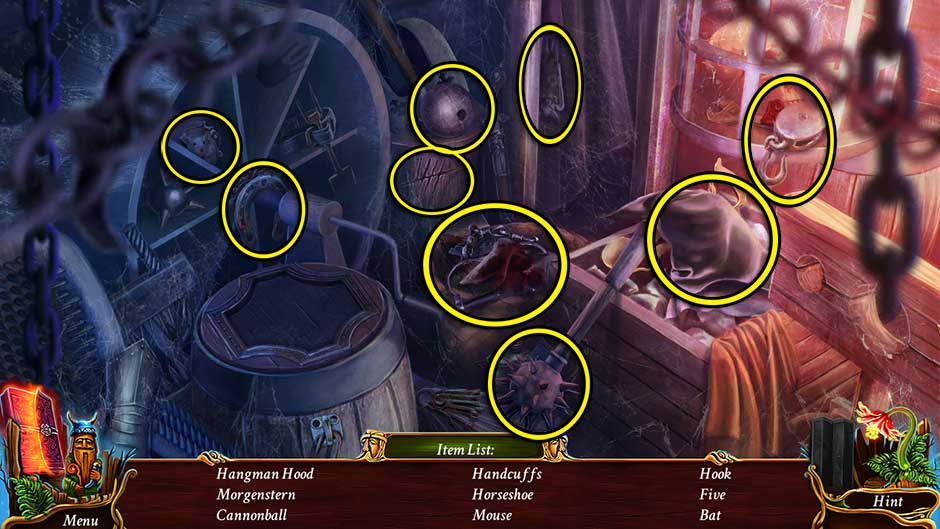
- Time to return to the wooden doors. Zoom in on the open doorway on the right. Take a closer look at the upper left portion of the stone wall. Place the Hook into the wood, then hang the Oil Lamp on it. A hidden object area will be revealed.
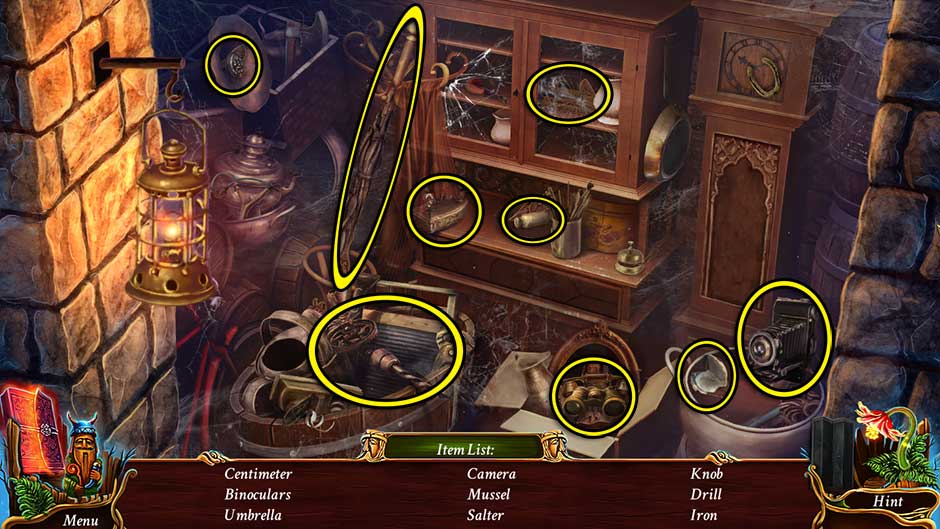
- Find the items listed at the bottom of the screen. Their locations are shown below. Once an item has been collected, a puzzle piece has been left behind. Click on these puzzle pieces once you find all the items to assemble the component necessary to reveal the key item within the clock: the Flat Shovel.
- Take a closer look at the gate across the cobblestone bridge ahead. Place the Flat Shovel under the door, then use the Skewer on the lock to push out the key. Click on the Flat Shovel, then use the Key to open the lock.
- Proceed through the doors to the next area.
Ground Floor
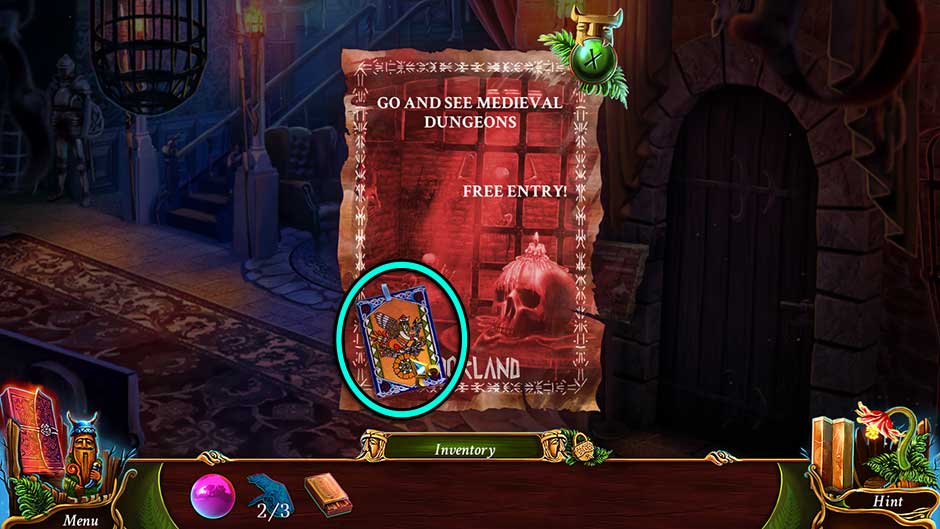
- Take a closer look at the sign next to the door on the right. Collect the Bestiary Card 23/30 taped to the poster.
- Examine the suit of armor on the far left. Click on the Helmet to add it to your inventory.
- Proceed up the staircase ahead into the next area.
Corridor
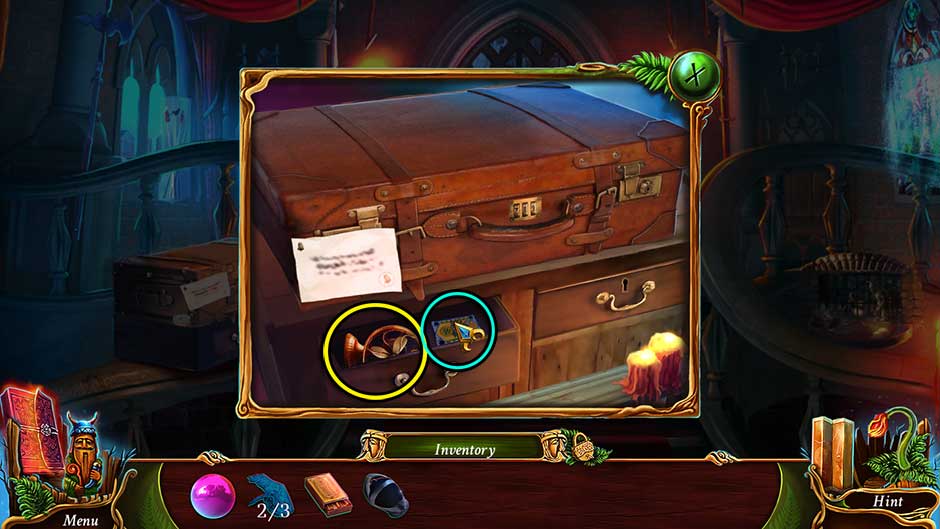
- Examine the suitcase sitting on the railing on the left. Read the note, then open the left drawer. Collect the Bestiary Card 24/30 and the Fan
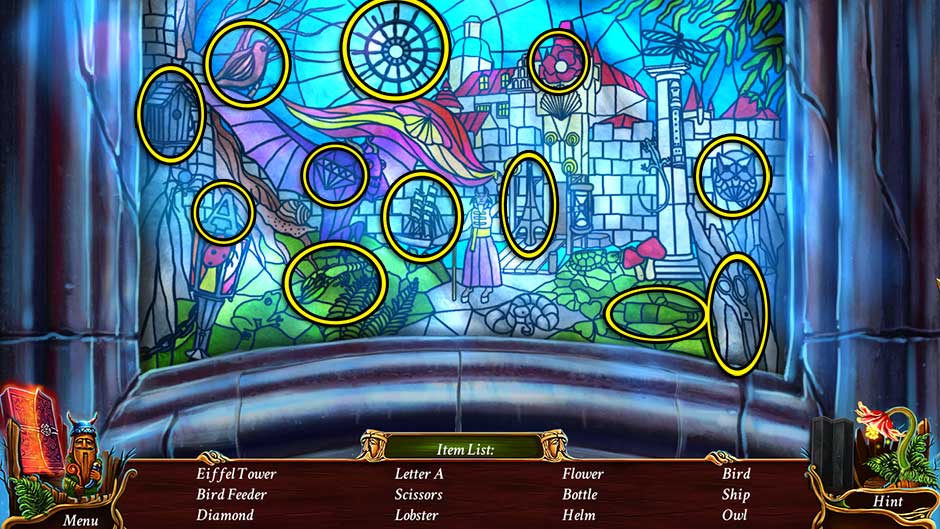
- Click on the stained glass window on the right to enter a hidden object area.
- Find all the items listed at the bottom of the screen. Their locations are shown below. Upon completing the area, a compartment will open, revealing the Rope.
- Examine the small grated area next to the right banister. Place the Fan here, then exit for now.
- Go back down to the Ground Floor.
Ground Floor
- Zoom in on the door on the right. Use the Rope to open the door, then enter the Dungeon.
Dungeon
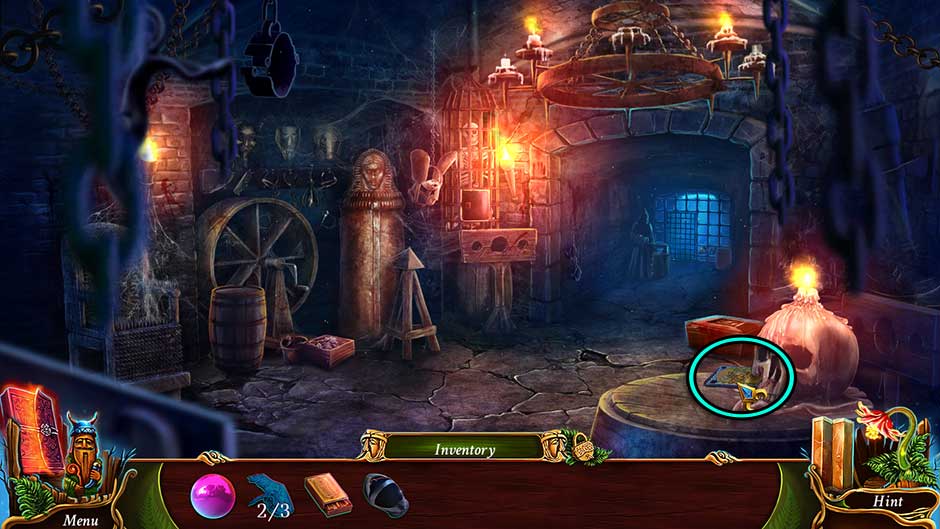
- Collect the Bestiary Card 25/30 next to the skull on the right.
- Examine the cage straight ahead. Click on the panel to open it. You will be returning here soon.
- Proceed down the hallway to the Cell.
Cell
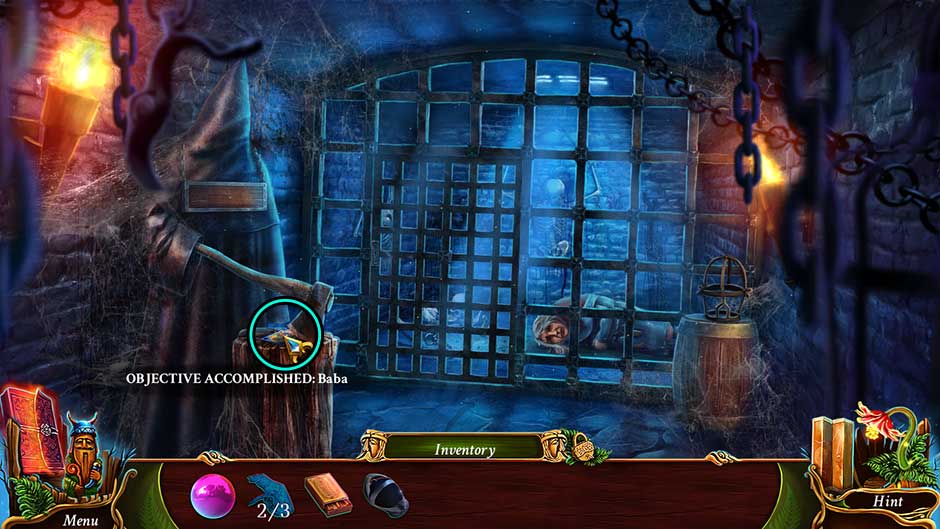
- Collect the Bestiary Card 26/30 sitting on the chopping block on the left.
- Zoom in on the cell straight ahead and talk with Baba. She will return your Ornamental Bracelet.
- Go back down the hallway to the main area of the Dungeon.
Dungeon
- Click on the hidden object area on the left.
- Find the objects listed at the bottom of the screen. Upon finding each object, you will uncover a puzzle piece. Find all the objects, then click on each of the glowing pieces to complete the panel on top of the barrel revealing the location of the key item: the Wolf Tokens 3/3.
- Make your way back to the Rocks area.
Rocks
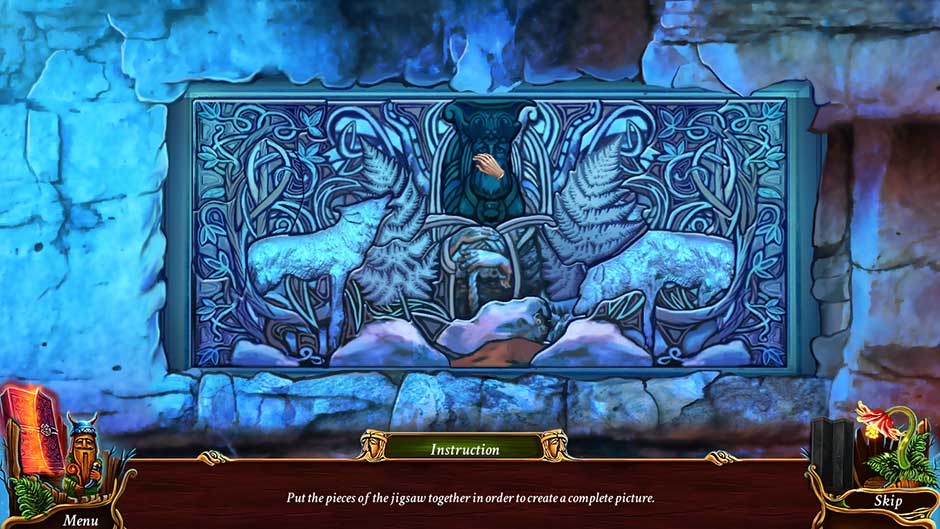
- Examine the rock face on the right. Use the Wolf Tokens 3/3 on the frame to trigger a puzzle.
- Put the pieces of the jigsaw together in order to create a complete picture. The solution is shown below.
- Upon completing the puzzle, click on the Gate Part (2) to add it to your inventory.
- Head back down to the Lodge.
Lodge
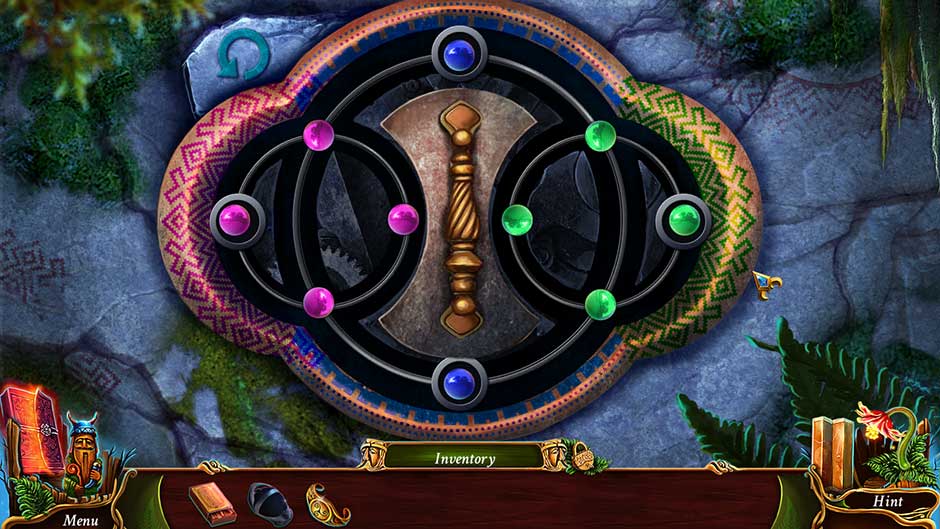
- Take a closer look at the gate on the left. Place the Gate Parts (x2) into the slots to trigger a puzzle.
- Rotate circles in such a way that each of them will contain only pieces of the correct color. The solution is shown below.
- Upon completing the puzzle, click on the stylized knob to open the gate and proceed through to the next area.
Tomb
- Examine the small statuette on the lower right. Collect the Ethereal Flower 28/30 and the Leather Glove.
- Zoom in on the stone pillar with the glass face ahead. Use the Leather Glove to remove the broken glass and collect the Finger on the upper shelf.
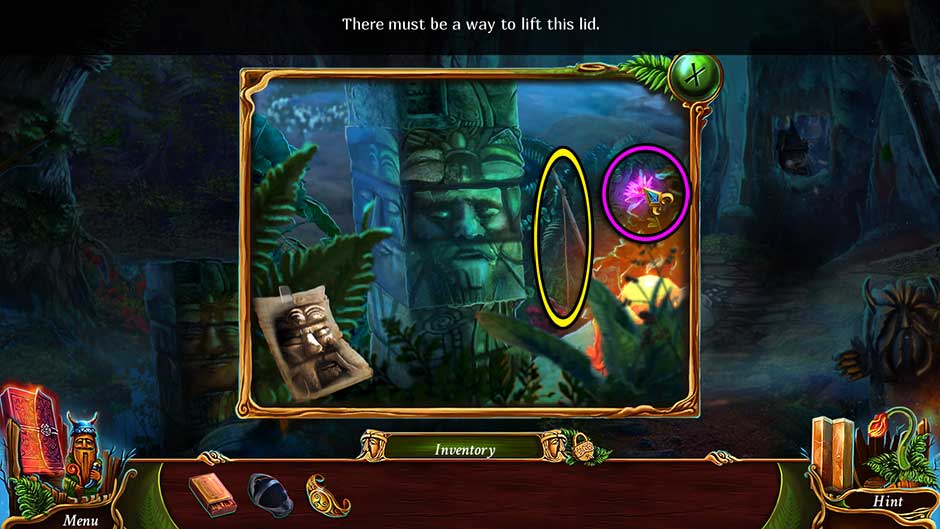
- Examine the small statuette on the lower right again and use the Finger on the hand on the left. Click on the scroll for an important hint you’ll be using nearby.
- Time to put that hint to good use! Zoom in on the small totem on the left. Collect the Ethereal Flower 29/30 and the Stick with Twine.
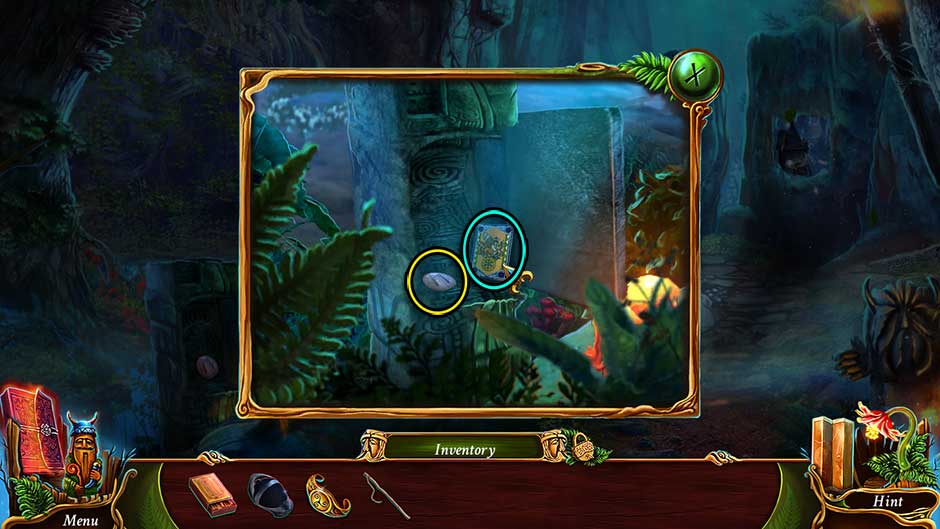
- Click on the sections of the totem until they match the drawing on the scroll. Once matched, click on the face to open a hidden compartment and collect the Bestiary Card 27/30 and the Magic Stone
- Take a closer look at the large stone slab straight ahead. Click on the Magic Stone (2) below the vial of blue liquid to add it to your inventory.
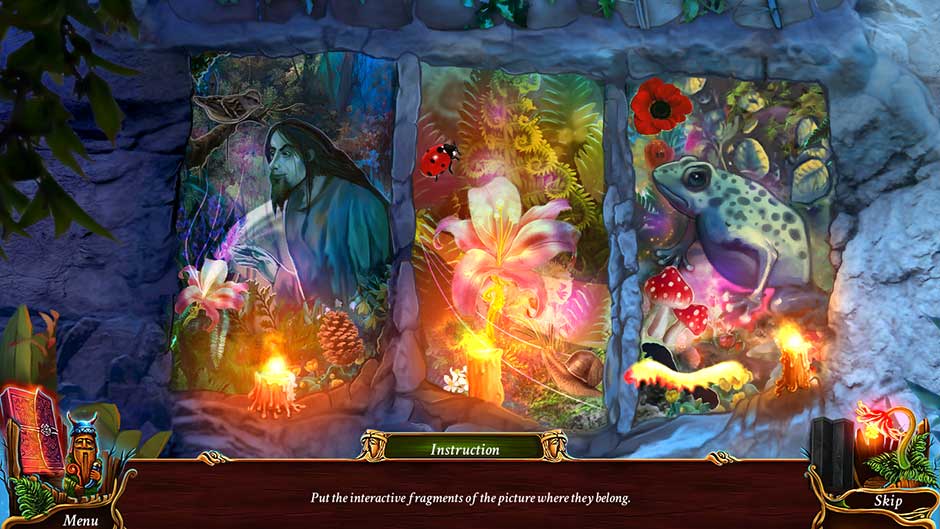
- Examine the large stone face on the left. Click on the branches to move them aside, then collect the Magic Stone (3) in the lower right corner. Place all Magic Stones (x3) into the slots to trigger a puzzle.
- Put the interactive fragments of the picture where they belong. The solution is shown below.
- Upon completing the puzzle, use the Ornamental Bracelet on the design within the revealed compartment. A cutscene will follow, and a new passageway will open.
- Proceed forward through the new passage to the next area.
Fern
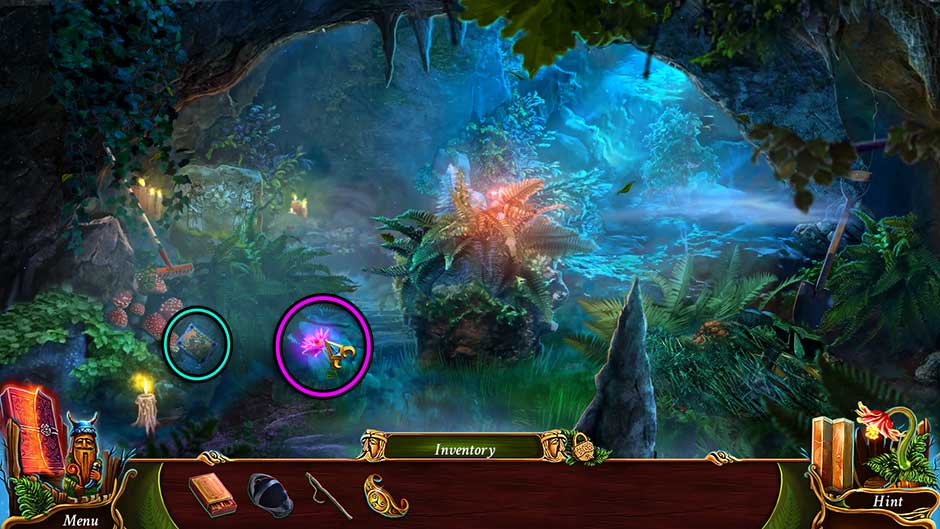
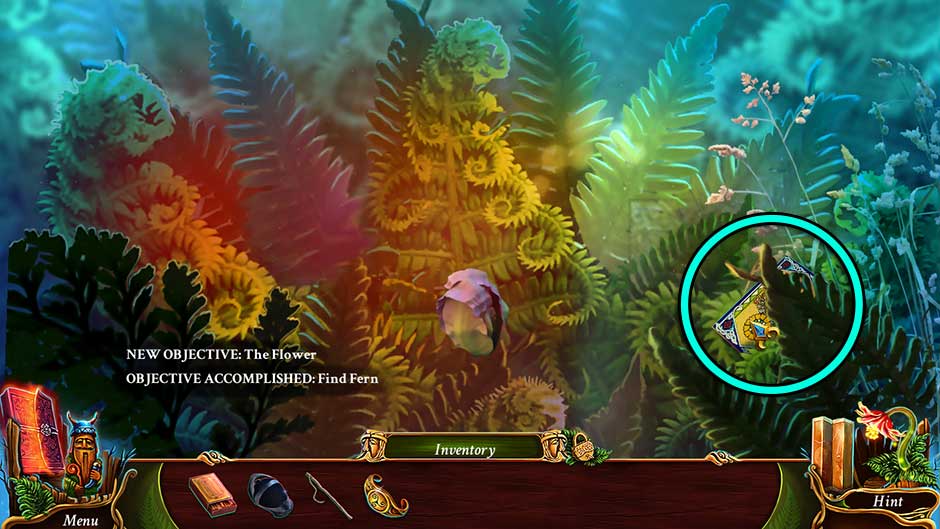
- Click on the branches obstructing your view, then collect the Ethereal Flower 30/30 and the Bestiary Card 28/30.
- Examine the fern straight ahead. Collect the Bestiary Card 29/30.
- Back in the main area, examine the stone on the left. Click on the Rake to add it to your inventory.
- Take a closer look at the ferns on the right. Use the Rake to clear them away, revealing a hidden object area.
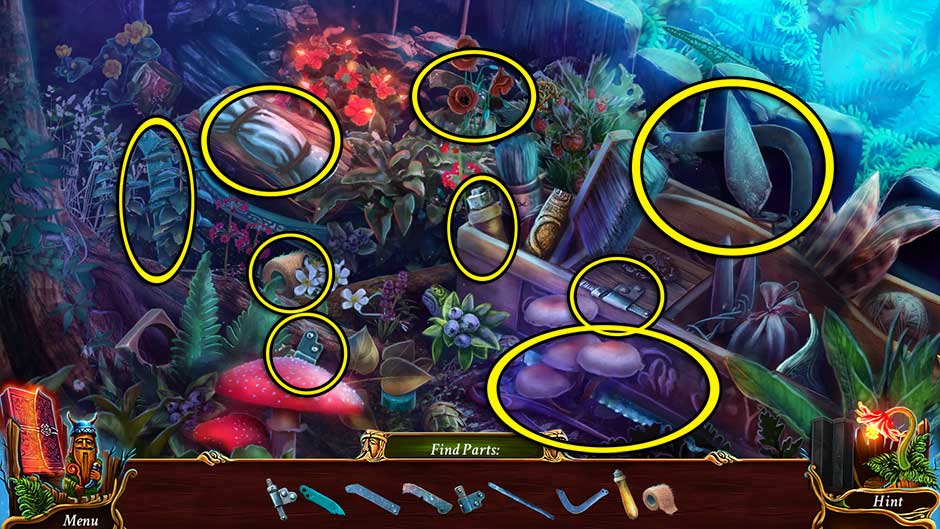
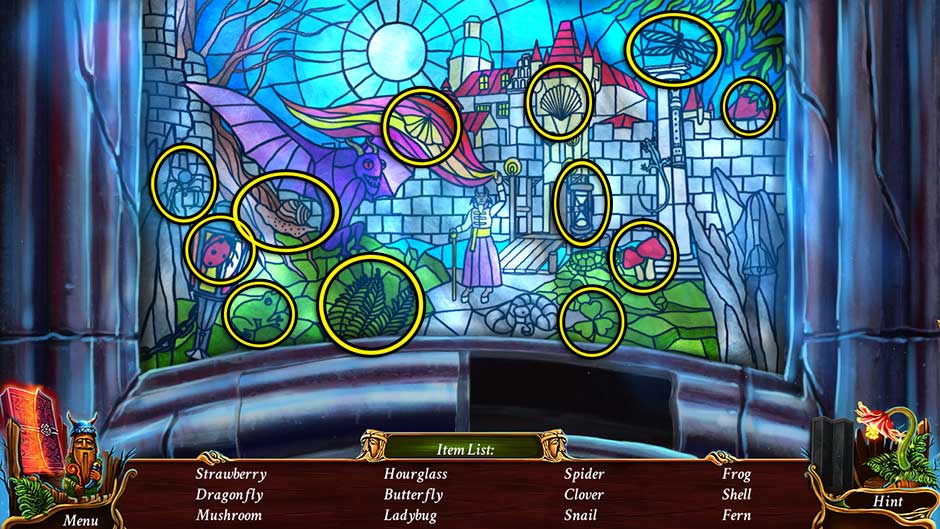
- Find the items shown at the bottom of the screen. Their locations are shown below. Upon completing the area, the Metal Saw will be added to your inventory.
- Make your way back to the Lodge.
Lodge
- Examine the bike on the right. Use the Metal Saw to remove the Rod from the body of the bicycle and add it to your inventory.
- Continue to the Tomb.
Tomb
- Take a closer look at the small statuette on the bottom right again. Use the Rod to pry off the rock beneath the statuette’s head. Click on the Lens inside to add it to your inventory.
- Zoom in on the rock with the glass ahead. Take a closer look at the Magnifier Glass and use the Lens to restore it. Click on it again to add it to your inventory.
- Go to the Fern area.
Fern
- Zoom in on the fern straight ahead. Use the Magnifier Glass on the fern to compile a list of necessary ingredients.
- Go back to the Tomb.
Tomb
- Examine the stone slab straight ahead. Now that you have directions from the fern, you will know how to use the chemistry set. Place the Matches on the slab, then exit for now. Tip: You’ll be returning here shortly!
- Head back to the Rocks.
Rocks
- Click on the hidden object area that appears on the left.
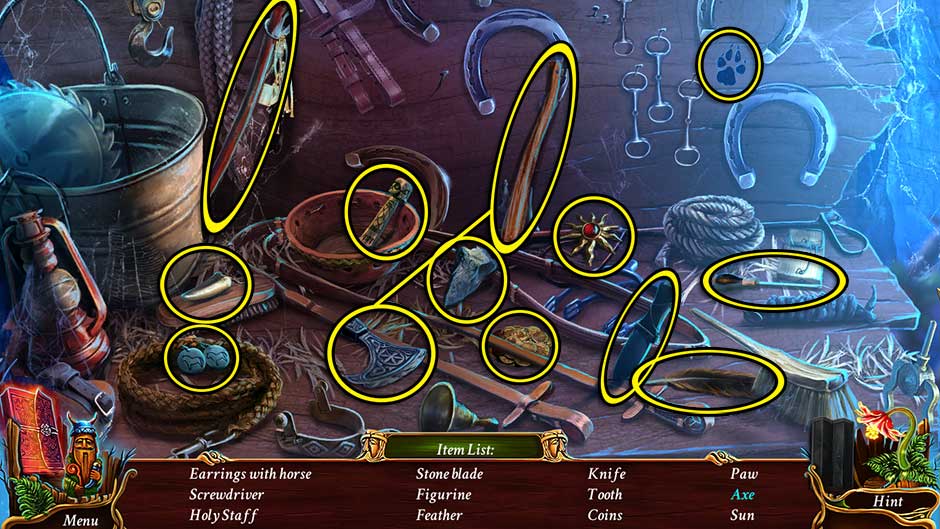
- Find the objects listed at the bottom of the screen. Their locations are shown below. Upon completing the area, the Screwdriver will be added to your inventory.
- Go to the Courtyard.
Courtyard
- Take a closer look at the cart on the left. Use the Screwdriver to remove the screws from the top of the box. Click to open the top and reveal a puzzle inside.
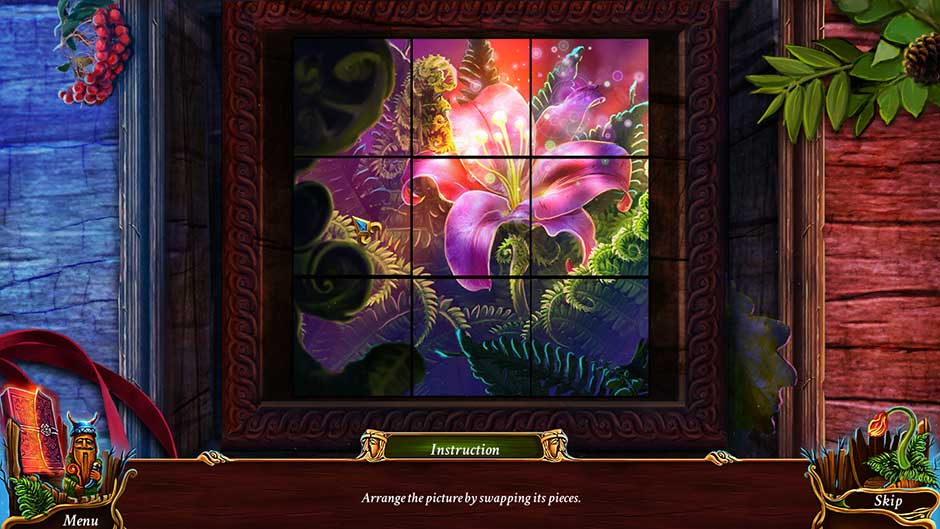
- Arrange the picture by swapping its pieces. The solution is shown below.
- Once the puzzle is completed, examine the note inside the box. It contains the code 4-8-1. Collect the Burettes inside to add them to your inventory.
- Head to the Ground Floor.
Ground Floor
- Take a closer look at the desk ahead. Use the Stick with Twine on the Magnet to obtain the Magnet on Stick.
- Enter the Dungeon.
Dungeon
- Examine the cage straight ahead. Use the Magnet on Stick to acquire the Pistol Token 1/2, then click to add it to your inventory.
- Head up to the Corridor.
Corridor
- Zoom in on the suitcase on the left again. Take a closer look at the lock and input the code 4-8-1. Click to open the suitcase and collect the Red Elixir
- Back in the main area, click on the stained glass window on the right to enter another hidden object area.
- Find the objects listed at the bottom of the screen. Their locations are shown below. Upon finding all the items, a secret compartment will open, revealing the Pitchfork.
- Examine the small gated area on the right of the railing. Give the Pitchfork to the demon figurine, then click on the Yellow Elixir and the Cupboard Key to add them to your inventory.
- Zoom in on the suitcase on the left again and use the Cupboard Key to open the drawer on the right. Collect the Relief Part
- Return to the Tomb.
Tomb
- Examine the large slab again and place the Burettes, the Red Elixir, and the Yellow Elixir on the stone to trigger a puzzle.
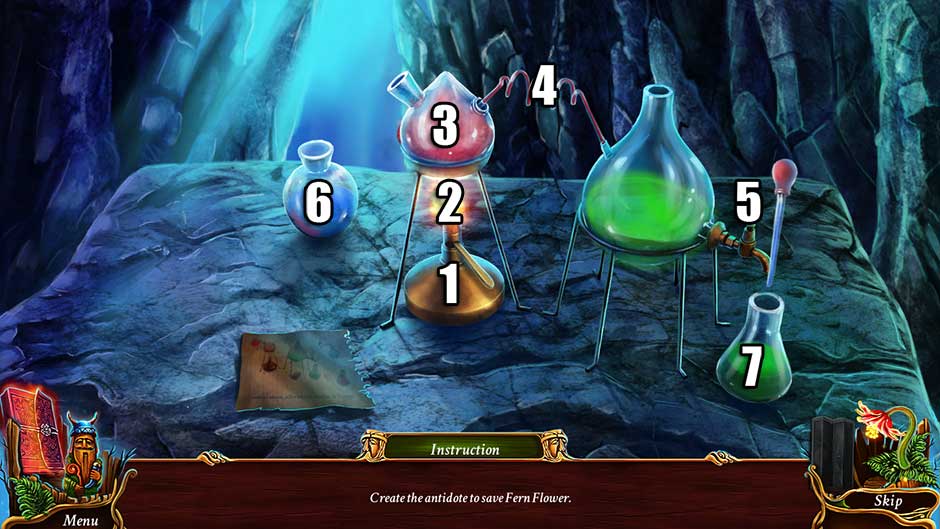
- Create the antidote to save Fern Flower. The steps are illustrated in the screenshot below:
- Click on the burner to turn it on.
- Use the match to light the burner.
- Pour the red elixir into the first glass burette.
- Attach the swirling glass tube and add yellow elixir to the second glass burette.
- Click on the valve to drain the liquid elixir.
- Use the dropper to collect blue elixir and add it to the green vial on the right.
- Collect the resulting Pesticide to add it to your inventory.
- Return to the Fern area.
Fern
- Zoom in on the fern straight ahead. Use the Pesticide on the flower. After a brief cutscene, click on the Fern flower to add it to your inventory.
- Click on the hidden object area that appears on the right.
- Find all the objects shown at the bottom of the screen. Their locations are shown below. Upon finding them all, the Pickaxe will be added to your inventory.
- Take a closer look at the stone slab on the left. Use the Pickaxe to remove the Relief Part (2) and add it to your inventory.
- Make your way back to the Courtyard.
Courtyard
- Examine the cart on the left. Use the Pickaxe to dislodge the Relief Part (3) from beneath the wheel.
- It’s Lilacus! You’ll need to find a way to help him escape. But there’s nothing you can do at the moment. Not to worry, though – you’ll return shortly.
- Take a closer look at the area at the top of the steps on the left. Click on the Firework Body lying on the ground to collect it.
- Go to the Ground Floor.
Ground Floor
- You’ll encounter a brief cutscene. Follow Boruta up to the Corridor.
Corridor
- Zoom in on the door ahead for another brief cutscene.
- Head to the Dungeon.
Dungeon
- Click on the hidden object area on the left.
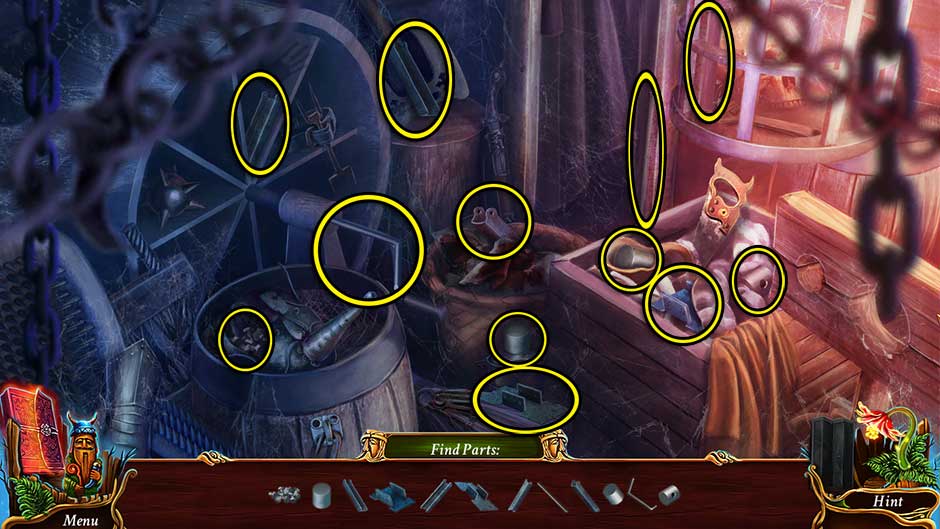
- Find the objects shown at the bottom of the screen. Their locations are shown below. Upon completing the area, the Car Jack will be added to your inventory.
-
- Proceed forward into the Cell.
Cell
- Take a closer look inside the Cell and read the note left behind. Collect the Firework Cap left beneath it.
- Examine the barrel on the right. Use the Pickaxe to break it open, then use the Helmet to collect the Oil.
- Return to the Ground Floor.
Ground Floor
- Examine the suit of armor on the far left. Use the Oil to loosen the right collar plate and collect the Relief Part (4).
- Zoom in on the engraving above the desk ahead. Place the Relief Parts (x4) into the frame to trigger a puzzle.
- Find interactive elements to progress the story. The solution is as follows:
- Scene One: Click the tourists, then Boruta
- Scene Two: Click on the fern, then the book, then Boruta, and finally the human sacrifice
- Scene Three: Click on Boruta, followed by the clouds of fear and sadness
- Upon completing the puzzle, click on the Diamond Ring and the Pistol Tokens 2/2 to add them to your inventory.
- Enter the Dungeon.
Dungeon
- Examine the chest on the right, beneath the archway leading to the Cell. Place the Pistol Tokens 2/2 into the slots, then collect the Gun Powder inside to add it to your inventory.
- Head back to the Courtyard.
Courtyard
- Take a closer look at the grate beneath which Lilacus is imprisoned. Use the Car Jack to free him. Lilacus will reward you with the Duct Tape.
- Examine the hole in which Lilacus was imprisoned to collect the Flashlight as well.
- Zoom in on the area at the top of the steps on the left, then examine the work table to the right of Lilacus. Place the Firework Cap, the Firework Body, and the Gun Powder on the table.
- Return to the Corridor.
Corridor
- Examine the small caged area on the right. Use the Duct Tape to repair the severed wire. Click on the plug to plug it in and turn on the fan, revealing the Fuse in front of it.
- Take a look at the window on the left. Place the Flashlight on the stand and use the Diamond Ring to cut open the glass and collect the Fireworks Sticks. You’ll be returning here shortly.
- Go back to the Courtyard.
Courtyard
- Examine the table next to Lilacus again and add the Fuse, the Fireworks Sticks, and the Duct Tape to the mix. Click on the resulting Fireworks to add them to your inventory.
- Place the Fireworks in the stand on the left, then give the Matches to Lilacus.
- Back in the main area of the Courtyard, you’ll notice a hidden object area has appeared on the right.
- Find the objects listed at the bottom of the screen. Their locations are shown below. Upon completing the area and clicking on all the secret component pieces that appear, the drawer will open, revealing the Battery.
- Head back to the Corridor.
Corridor
- Zoom in on the window on the left. Place the Battery into the flashlight.
- Click on the flashlight to signal Lilacus.
- Enter the Tower.
Tower
- Take a closer look at the table at the back of the room. Collect the final Bestiary Card 30/30 and add the Fern to the mortar on the right. Use the pestle to crush it and add the mixture to the potion.
- Watch the cutscene that follows!
- Examine the stone figure of Boruta. Click on the Chain Key hanging around his neck to retrieve it.
- Zoom in on Baba and use the Chain Key to free her.
Congratulations! You’ve completed the Slavic Fable adventure of Eventide – Slavic Fable! The Midsummer Night bonus content is now unlocked and can be accessed via the Main Menu.
Bonus Chapter: Midsummer Night
Once a year, in the heart of the forest on a Midsummer’s Night, the Fern Flower blossoms. Legend has it, if the flower is found by one pure of heart, the flower will grant any wish he or she desires.
House
- Click on the bed on the right to remove the blankets until you acquire the Sheet.
- Take a closer look at the window straight ahead. Untie the curtains, move the pot, and collect the Matches Open the window and tie the Sheet to the peg. But, hm, you’ll need more length..
- Examine the chest beneath the window on the right. Click on the Stool to add it to your inventory.
- Place the Stool in front of the shelf on the left, then take a closer look at the top. Use the Matches to light the candle. Read the top book, then collect the Trunk Token in the shape of a sun lying beneath.
- Examine the chest beneath the window again and place the Trunk Token into the lock. Take a closer look inside the chest to trigger a puzzle.
- Arrange the picture by swapping its pieces. The solution is shown below.
- Upon completing the puzzle, collect the Sheet.
- Zoom in on the window again and use the Sheet to extend the rope.
- Proceed out the window and into the Village.
Village
- Take a closer look at the table on the right. Collect the folded Map on the right, then collect the Lockpick and place the surrounding shapes into their appropriate slots in the lantern.
- Back in the main area, examine the round glass door ahead. Use the Lockpick to open the lock and collect the Candle
- Examine the table on the right again and place the Candle into the lantern. Use the Matches to light it, then click to add the Lantern to your inventory.
- Proceed forward into the Swamp.
Swamp
- Use the Lantern to illuminate the area and speak with Leshy.
- Take a closer look at the bear cub ahead. Remove the leaf lying on top of the Block on the left and click to add it to your inventory.
- Proceed forward to the Outdoor area.
Outdoor
- Examine the door on the left. Insert the Block to trigger a puzzle.
- Turn around elements of the lock so that all the symbols are visible. The solution is shown below.
- Note the anchor inside the doorway. You’ll return to this later.
- Take a closer look at the nest lying on the ground ahead. Click on the Handle and the Nest on the left to collect them.
- A hidden object area will appear. Find the items shown at the bottom of the screen. Their locations are shown below. Upon completing the area, the Hoe will be added to your inventory.
- Zoom in on the portion of ground where you found the Nest. Use the Hoe to acquire the Handle and the Mold.
- Take a closer look at the lit alcove on the right side of the tree. Click to add the Watering Can to your inventory, then use the Handle on the cabinet at the top of the window to open it and acquire the Line.
- Return to the Village.
Village
- Take a closer look at the round glass door again. Use the Watering Can to collect the water on the left, obtaining the Full Watering Can.
- Return to the Outdoor area.
Outdoor
- Take a closer look at the doorway on the left and use the Line on the anchor to acquire the Line with Anchor.
- Zoom in on the branches of the tree straight ahead, above the area where you found the Nest. Throw the Line with Anchor up into the branches, then click to bring them down. Place the Nest into the branch and collect the Snare Part the bird drops.
- Go down to the Swamp.
Swamp
- Zoom in on the bear cub again, then examine the trap it’s caught in. Place the Snare Part into the trap and use the Handle on the trap itself. Click on the handle on the left to trigger a puzzle.
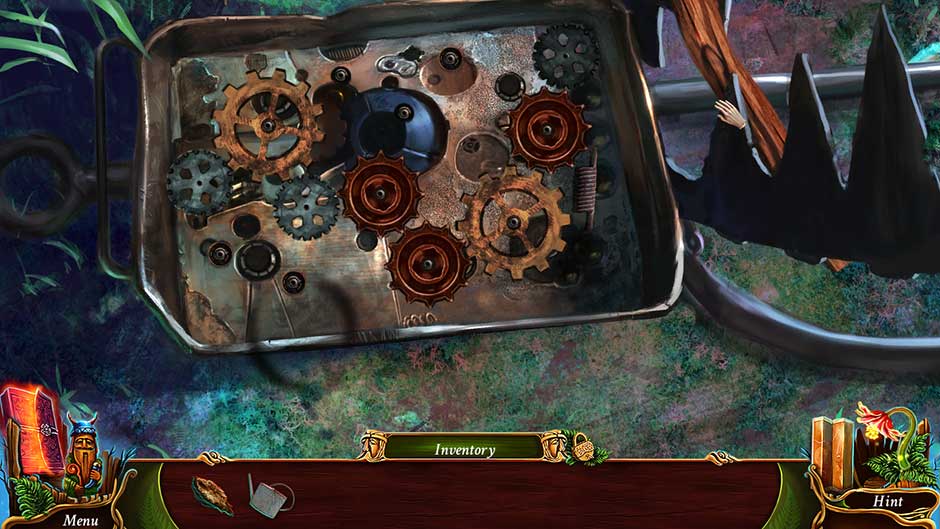
- Complete the mechanism by arranging the gears so that all of them move. The solution is shown below.
- Upon completing the puzzle, click on the stick Handle on the right again to pry open the trap and free the cub.
- Back in the main area, examine the foliage on the left. Place the Mold on the ground and use the Full Watering Can to grow a number of flowers – as well as a new hidden object area.
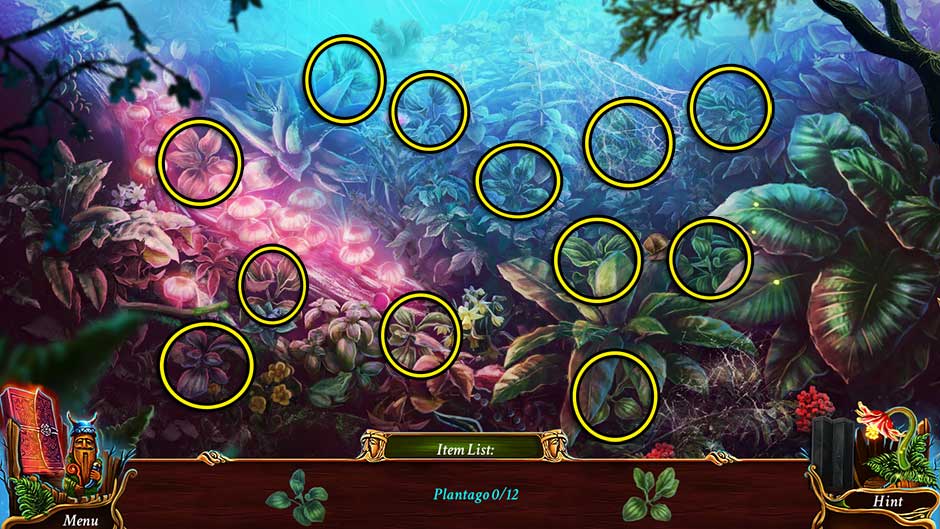
- Find 12 shoots of Plantago. Their locations are shown below. You will need to use the stick on the left to remove the cobwebs on the upper right. Upon completing the area, the Plantago will be added to your inventory.
- Leshy will appear again. Speak with him.
- Examine the bear cub and use the Plantago on his wound.
- Proceed forward toward the Lodge.
Lodge
- Speak with Tubber.
- Examine the trough on the left. Click on the Hat beneath to add it to your inventory.
- Take a closer look at the area beneath the Lodge and use the Hat here to trigger a hidden object area.
- Assemble the Scarecrow by locating items according to the silhouettes shown at the bottom of the screen. The solution to the area is as follows:
- Examine the shoes to the left of the work bench and collect the Token on the lower right.
- Look at the hanging picnic basket on the upper left and use the Token to open it, then collect the Corn and the Cheese
- Feed the Corn to the chicken under the bench and collect the Key and Feather from the nest.
- Use the Key on the round box sitting on the bench to open it and collect the Pin
- Examine the shirt draped over the barrel on the right and use the Pin to stitch it. Click to collect the Jacket.
- Collect the Knife in the left corner of the work bench.
- Use the Knife on the Pumpkin on the left, then click to collect it.
- Take a closer look at the shoes to the left of the bench and give the Cheese to the mouse and collect the Rope
- Use the Rope to secure the sticks propped up against the work bench.
- Place the Feather into the Hat, then click to collect it.
- Apply the Jacket, the Pumpkin, and the Hat to the stick frame. Click to collect the finished Scarecrow.
- Examine the trough on the left again and use the Scarecrow to frighten the birds. Collect the Pipe Part in the trough.
- Take a closer look at the panel on the right side of the Lodge. Use the Pipe Part Tip: You will need one more component before you can trigger the puzzle here.
- Head up the path on the left into the Maze.
Maze
- Click on the red Valve lying on the ground on the right.
- Go back to the Lodge.
Lodge
- Examine the panel on the right side of the Lodge again and place the Valve on the upper right pipe to trigger a puzzle.
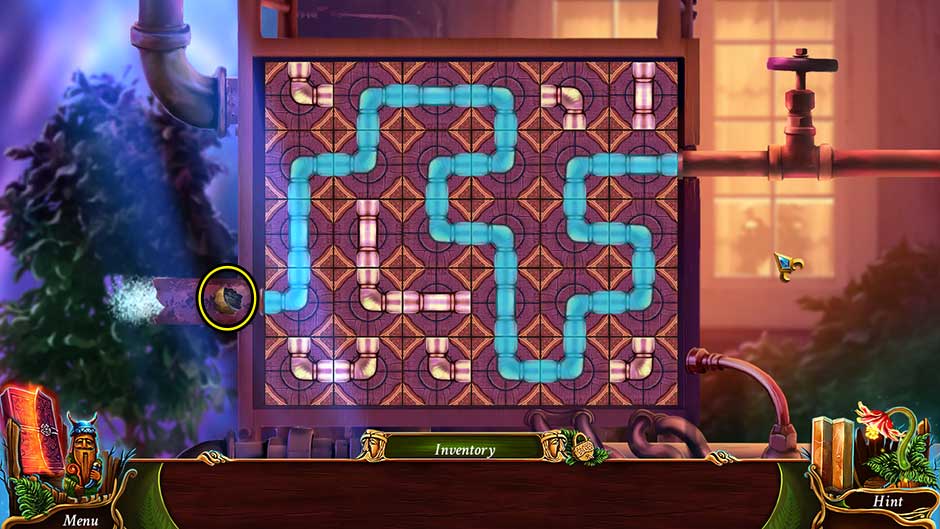
- Arrange the pipes by rotating them so that the water can flow. The solution is shown below.
- Upon completing the puzzle, the Moon Token will be added to your inventory.
- Speak with Tubber again. He will give you the Ritual Dagger.
- Head into the Maze.
Maze
- Click to remove the moss from the tree on the right, and the left portion of the tree straight ahead. Two symbols will be revealed.
- Take a closer look at the wooden carvings on the right side of the center tree. Place the Horn in the hand of the statue on the left, then the Eye from the right statue’s hand into the left statue’s eye socket. Place the round emblem from the left statue’s mouth into the groove on the front of the right statue. Place the golden tooth that appears into the mouth of the right statue. The correct symbol will be revealed.
- Head down the Left path.
- Click on the moss on the right single tree, and the bottom left corner of the center tree to reveal two symbols.
- Collect the Arrow stuck in the bottom right portion of the tree ahead. Use the Arrow on the Crossbow on the right to add it to your inventory.
- Use the Crossbow to shoot down the gold amulet hanging on the upper left. Take a closer look at the design on the amulet to reveal which path should be taken.
- Head down the Left path.
- Click on the patch of moss straight ahead, as well as on the tree on the right to reveal two symbols.
- Click on the bush to the immediate right of the owl and collect the Maze Token hidden beneath.
- Examine the box on the ground on the right and use the Maze Token on the slot to trigger a puzzle.
- Arrange the picture by swapping its pieces. The solution is shown below.
- Once finished, click on the completed panel to open the box, revealing a symbol.
- Head down the Left path.
Tomb
- Examine the statue straight ahead. Click on the Twig in the lower left corner to add it to your inventory.
- Zoom in on the flat stone on the ground straight ahead. Use the Twig to remove the debris. Click on the gold Flower Token in the indentation on the right, then place the stone Vase lying on its side in the upper left corner into the groove where the Flower Token was. A hidden object area will be triggered.
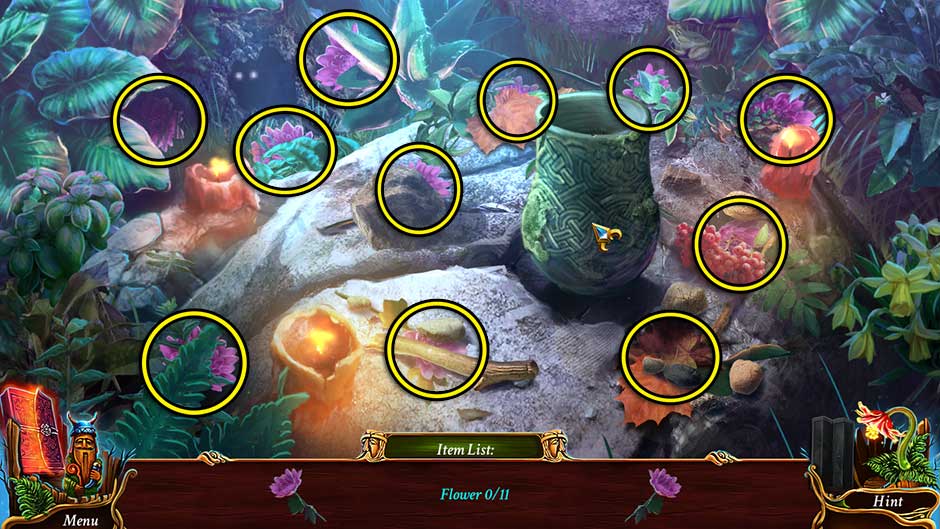
- Find 11 Flowers scattered throughout the area. You may have to move some debris to find them. Their locations are shown below.
- Upon completing the area, click on the Vase with Flowers to add it to your inventory.
- Zoom in on the statue straight ahead. Place the Vase with Flowers on the pedestal in the lower right corner, and the Ritual Dagger in the sheath to the left of the statue. Click on the Sun Token that appears in the statue’s hand to add it to your inventory.
- Examine the stone slab to the right of the statue. Place the Moon Token, the Flower Token, and the Sun Token into their correct slots. A puzzle will be revealed.
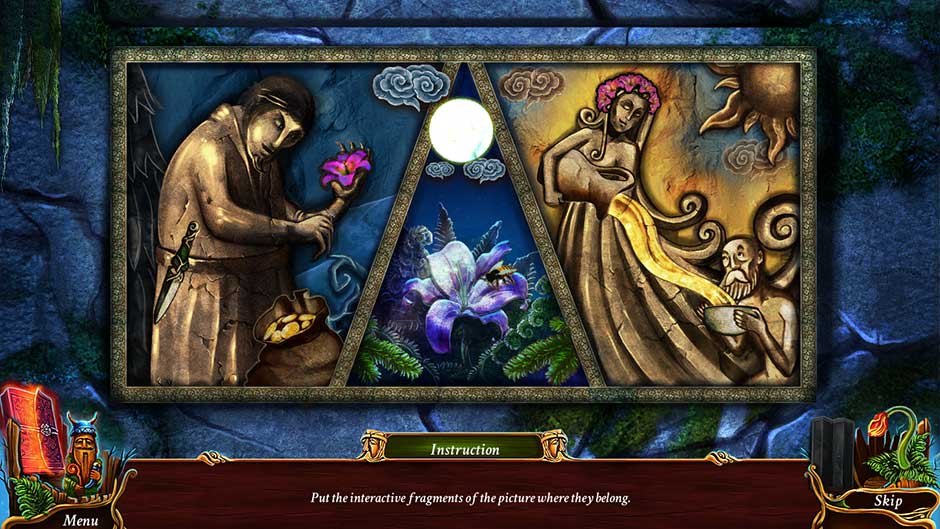
- Put the interactive fragments of the picture where they belong. The solution is shown below.
- Upon completing the puzzle, click on the lever inside to reveal a secret passage.
- Enter the secret passage to the left of the statue.
Fern
- Click on the Fern Flower to collect it.
- Return to the Tomb.
Tomb
- Speak with Leshy. He will open up a shortcut passage back to the Village.
Village
- Give the Fern Flower to Mom.
Congratulations! You’ve completed Eventide – Slavic Fable Platinum Edition! Be sure to visit our blog for more great tips and tricks!
The Eventide – Slavic Fable Walkthrough is meant as a guide and does not contain cheats, hacks, or serials.

